
Ynlieding
This instruction manual provides comprehensive guidance for the installation, operation, maintenance, and troubleshooting of your Intel Classic DH61CR Desktop Motherboard. Please read this manual thoroughly before proceeding with installation or operation to ensure proper functionality and to prevent damage to the product or other components.
The Intel DH61CR motherboard is designed to support Intel LGA 1155 socket processors and DDR3 memory, offering a reliable foundation for personal computer systems.
Opset en ynstallaasje
1. Unpacking and Component Overview
Carefully remove the motherboard from its packaging. Inspect all components for any signs of damage. Ensure all accessories listed in the product documentation are present.
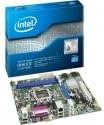
Image: The Intel DH61CR Desktop Motherboard shown alongside its retail packaging. This image provides a visual reference for the product and its initial presentation.
Familiarize yourself with the layout of the motherboard, including the CPU socket, RAM slots, expansion slots, and various connectors.
2. CPU-ynstallaasje (LGA 1155-socket)
- Sykje de LGA 1155 CPU-socket op it moederbord.
- Druk de laadhendel foarsichtich nei ûnderen en lûk it nei de kant om it CPU-socket-behâldframe te iepenjen.
- Rjochtsje de trijehoekige mark op 'e CPU út mei de oerienkommende mark op 'e socket. Plak de CPU foarsichtich yn 'e socket sûnder it te forsearjen.
- Close the retention frame and secure it by pushing the load lever back into its locked position.
- Apply a thin, even layer of thermal paste to the top of the CPU (if not pre-applied to the cooler).
- Install the CPU cooler according to its manufacturer's instructions, ensuring it is securely fastened and making good contact with the CPU.
3. RAM-ynstallaasje (DDR3)
- Identify the DDR3 memory slots. The Intel DH61CR supports DDR3 RAM.
- Iepenje de klips oan beide úteinen fan 'e ûnthâldslot.
- Rjochtsje de ynkeping op 'e DDR3-ûnthâldmodule op mei de kaai yn 'e ûnthâldslot.
- Druk stevich oan beide úteinen fan 'e ûnthâldmodule oant de klips fêstklikke en de module fêstsette.
4. Ynstallearjen fan opslachapparaat
Connect your SATA hard drives or solid-state drives to the SATA ports on the motherboard using SATA data cables. Ensure the power cables from your power supply are also connected to these devices.
5. Stroomfoarsjenningsferbiningen
- Ferbine de 24-pins ATX-stroomferbining fan jo stroomfoarsjenning mei de haadstroomsocket op it moederbord.
- Connect the 4-pin (or 8-pin, if applicable) ATX 12V power connector to the CPU power socket.
- Soargje derfoar dat alle stroomferbiningen feilich binne.
6. Ferbiningen op it foarpaniel
Connect the front panel cables from your computer case (power button, reset button, HDD LED, power LED, USB ports, audio jacks) to the corresponding headers on the motherboard. Refer to the motherboard's silkscreen labels for correct pin assignments.
7. Útwreidingskaarten
Install any necessary expansion cards (e.g., graphics card, network card) into the appropriate PCIe x16 or PCIe x1 slots. Secure them with the case's retention mechanism.
Operating Instructions
1. Earste opstart
After all components are installed and connected, connect your monitor, keyboard, and mouse. Power on the system. The system should display the BIOS POST screen. If not, refer to the Troubleshooting section.
2. BIOS/UEFI-tagong
To access the BIOS/UEFI setup utility, press the designated key (commonly Del, F2,of F10) during the initial boot sequence. The exact key is usually displayed on the screen during POST.
Within the BIOS/UEFI, you can configure boot order, system time, hardware settings, and other advanced options. Save changes before exiting.
Ûnderhâld
1. Cleaning
Regularly clean the interior of your computer case to prevent dust buildup, which can lead to overheating. Use compressed air to remove dust from fans, heatsinks, and motherboard components. Ensure the system is powered off and unplugged before cleaning.
2. BIOS-updates
Periodically check the Intel support website for BIOS updates for your DH61CR motherboard. BIOS updates can improve system stability, add support for new hardware, or fix bugs. Follow the instructions provided by Intel carefully when performing a BIOS update to avoid system damage.
Troubleshooting
As jo problemen tsjinkomme, opnijview de folgjende mienskiplike stappen foar probleemoplossing:
- Gjin macht: Ensure all power cables (24-pin ATX, 4-pin CPU) are securely connected. Check the power supply unit (PSU) switch and wall outlet.
- Gjin werjefte: Verify the monitor is connected and powered on. Ensure the graphics card (if dedicated) is properly seated and powered. If using integrated graphics, confirm the monitor is connected to the motherboard's video output.
- Systeempieps: A series of beeps during startup usually indicates a hardware issue. Consult the motherboard's beep code guide (often found on the manufacturer's support website) to diagnose the specific problem (e.g., RAM error, graphics card issue).
- Systeemynstabiliteit/crashes: Check for proper CPU cooler installation and thermal paste application. Ensure RAM modules are correctly seated. Test memory with diagnostic tools. Update drivers and BIOS.
- Bestjoeringssysteem wurdt net laden: Verify the boot order in BIOS/UEFI. Check SATA cable connections to storage devices. Ensure the operating system is correctly installed on a bootable drive.
For persistent issues, consult the Intel support webside of nim kontakt op mei har technyske stipe.
Technyske spesifikaasjes
| Eigenskip | Spesifikaasje |
|---|---|
| Merk | Intel |
| Model Namme | DH61CRB3 |
| CPU Socket | LGA 1155 |
| Kompatible prosessors | Intel Core i3-2100, Intel Core i5-2400, Intel Core i7-2600, Pentium |
| Chipsettype | Intel H61 Express |
| RAM Memory Technology | DDR3 |
| Maksimum RAM | 8 GB |
| Unthâld Clock Speed | 1333 MHz |
| Kompatibele apparaten | Persoanlike kompjûter |
| Storage Interface | Serial ATA/300 |
| Utwreiding Slots | 1 x PCIe x16 Slot |
| Video Output | CPU Dependent Video |
| Perron | Windows 7, Windows Vista Ultimate |
| Produkt Ofmjittings | 10.5 x 8.5 x 2 inch |
| Item Gewicht | 1.9 pyk |
| Fabrikant | INTEL |
| Datum Earste Beskikber | 30 april 2012 |
Garânsje en stipe
Warranty information for the Intel Classic DH61CR Desktop Motherboard is typically provided with the product at the time of purchase or can be found on the official Intel webside. Bewarje jo bewiis fan oankeap foar garânsjeclaims.
For technical support, driver downloads, and additional documentation, please visit the official Intel support website. You can often find detailed FAQs and community forums there to assist with common issues.
Note: Intel's official support channels are the primary resource for product-specific assistance.