Ynlieding
This instruction manual provides detailed guidance for the assembly and care of your TAMIYA 1/35 scale German Panzerkampfwagen III Ausf.L model kit. This set includes the tank model and six figure parts, featuring Field Marshal Erwin Rommel and five DAK tank crew members, designed to create a realistic front-line diorama scene.
Careful attention to these instructions will ensure a successful and enjoyable model building experience.
Wat is yn 'e doaze
Verify that all components are present before beginning assembly. The kit includes:
- 1/35 scale Panzerkampfwagen III Ausf.L tank model components
- Six (6) figure parts: Field Marshal Erwin Rommel and five DAK tank crew members
- Spare track sections
- Decal blêd
- Instruction booklet (this document)
Opset en gearkomste
Assembly of this model kit requires precision and patience. Follow the numbered steps provided in the included diagrammatic instructions. Ensure you have appropriate modeling tools such as plastic cement, hobby knife, tweezers, and paints (sold separately).
- Tarieding: Carefully remove all parts from the sprues using a hobby knife or nippers. Clean any excess plastic (flash) from the parts using a hobby knife or fine sandpaper. Organize parts by section to facilitate assembly.
- Chassis-assemblage: Begin with the lower hull and suspension components. Attach road wheels, idlers, and drive sprockets according to the diagrams. Ensure proper alignment for track installation.
- Track ynstallaasje: Assemble the individual track links or flexible track sections as instructed. Test fit the tracks to ensure they wrap correctly around the wheels.
- Upper Hull and Turret: Assemble the upper hull, adding details such as hatches, tools, and armor plates. Construct the turret, including the main gun and commander's cupola.
- Figuer Gearstalling: Assemble the six figures, paying attention to their poses. These figures are designed to complement the tank in a diorama setting.
- Painting and Decals: After primary assembly, paint the model and figures using appropriate colors for the German Africa Corps. Apply decals as desired, following the decal placement guide. Allow paint and decals to dry completely before handling.
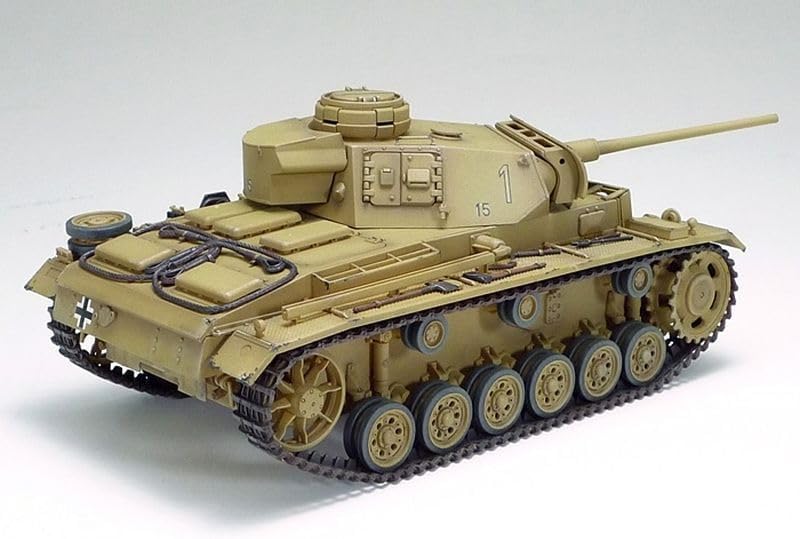
Image: The fully assembled TAMIYA Panzerkampfwagen III Ausf.L tank model, showcasing syn detaillearre konstruksje.
Bedriuwen en werjaan
Once assembled and painted, your model is ready for display. This kit is particularly suited for creating a diorama.
- Diorama Creation: Position the tank and figures to recreate a dynamic scene. The figures, including Field Marshal Rommel, are posed to interact with the tank and each other, enhancing the narrative of your display.
- Stable pleatsing: Ensure the model is placed on a stable, level surface to prevent accidental falls and damage.
- Miljeu-oerwegingen: Avoid direct sunlight, extreme temperatures, and high humidity, which can damage paint and plastic over time.

Image: The TAMIYA Panzerkampfwagen III Ausf.L model displayed with the included six crew figures, illustrating a potential diorama setup.
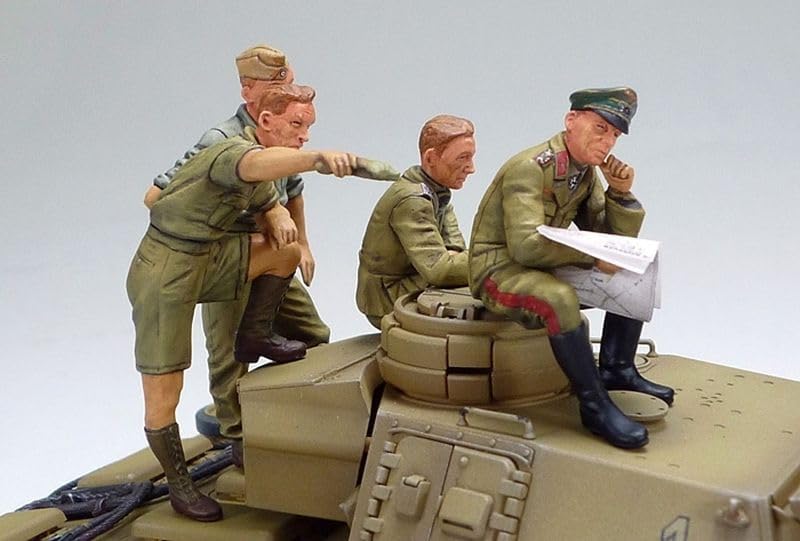
Ofbylding: In detaillearre view of Field Marshal Rommel and DAK tank crew figures positioned on the Panzerkampfwagen III Ausf.L model, highlighting their poses and interaction.
Ûnderhâld
Proper maintenance will preserve the appearance and integrity of your model for years to come.
- Reiniging: Dust the model regularly with a soft, dry brush or a can of compressed air. Avoid using wet cloths or harsh cleaning agents, which can damage paint and decals.
- Behanneling: Handle the model by its base or sturdy sections to avoid breaking delicate parts.
- Opslach: If storing the model, place it in a dust-free, temperature-controlled environment, ideally in a display case or a sealed container.
Troubleshooting
Encountering issues during model assembly is common. Here are solutions to frequent problems:
- Dielen net passend: Ensure all flash is removed from the parts. Test fit parts before applying cement. If a part is too tight, gently sand the mating surfaces. If too loose, apply a small amount of filler or a thicker cement.
- Ferveproblemen: Ensure surfaces are clean and dry before painting. Apply paint in thin, even coats to avoid brush marks or clumping. Allow sufficient drying time between coats.
- Decal Application Problems: Use decal setting solutions to help decals conform to irregular surfaces and eliminate silvering. Ensure the surface is glossy before applying decals and matte after sealing.
- Untbrekkende of beskeadige ûnderdielen: Carefully check the sprues and packaging. If a part is genuinely missing or damaged, contact TAMIYA customer support (see Support section).
Spesifikaasjes
| Merk | TAMIYA |
| Model Namme | Panzerkampfwagen III Ausf.L |
| Model Number | TM32405 |
| Skaal | 1:35 |
| Materiaal | Plestik |
| Item Ofmjittings (L x B x H) | 6.25 x 3.26 x 2.81 inch |
| Item Gewicht | 0.1 kilogram |
| Ynbegrepen komponinten | Tank model parts, 6 crew figures (Rommel and 5 DAK tank crew), spare track |
| Age Range (Beskriuwing) | Folwoeksen |
Warranty Information
This product is sold without an explicit manufacturer's warranty. Please inspect all parts upon receipt. For issues with missing or defective components directly from the manufacturer, refer to the support section.
Stypje
For technical assistance, questions regarding assembly, or inquiries about missing parts, please contact TAMIYA customer support through their official website of autorisearre distributeurs.
TAMIYA Official Website: www.tamiya.com
Always refer to the specific contact information provided on the product packaging for the most accurate support details in your region.