1. Ynlieding
Thank you for choosing the Einhell TC-RH 800 E Rotary Hammer. This powerful tool is designed for drilling, hammer drilling, and chiseling in concrete, masonry, wood, and metal. It features an 800W motor, 2.5 Joules of impact energy, and an SDS Plus chuck for quick and secure bit changes. Please read this manual thoroughly before operating the tool to ensure safe and efficient use.
2. Algemiene Safety Ynstruksjes
Nim altyd de folgjende feilichheidsmaatregels yn acht by it brûken fan elektryske ark:
- Wurkgebiet feilichheid: Hâld it wurkgebiet skjin en goed ferljochte. Rommelige of tsjustere gebieten noegje út ta ûngemakken. Brûk gjin elektryske ark yn eksplosive atmosfearen, lykas yn 'e oanwêzigens fan brânbere floeistoffen, gassen of stof.
- Elektryske feiligens: Stekkers fan elektrysk ark moatte oerienkomme mei it stopkontakt. Wizigje de stekker noait op ien of oare manier. Foarkom lichemskontakt mei ierdske oerflakken lykas piipen, radiatoren, fornuizen en kuolkasten.
- Persoanlike feiligens: Always wear eye protection. Use hearing protection when operating noisy tools. Wear a dust mask if operations create dust. Dress properly; avoid loose clothing or jewelry. Secure long hair.
- Gebrûk en soarch fan ark: Forsearje it elektryske ark net. Brûk it juste elektryske ark foar jo tapassing. Doch de stekker út it stopkontakt foardat jo oanpassingen meitsje, accessoires feroarje of elektryske ark opslaan.
- Tsjinst: Lit jo elektryske ark ûnderhâlde troch in kwalifisearre reparaasjepersoan dy't allinich identike ferfangende dielen brûke. Dit sil derfoar soargje dat de feiligens fan it elektryske ark wurdt behâlden.
3. Produkt Components
Familiarize yourself with the main components of your Einhell TC-RH 800 E Rotary Hammer:
- SDS Plus Chuck
- Auxiliary Handle
- Djipte stopje
- Mode Selector Switch (Drill, Hammer Drill, Chisel)
- Rotation Direction Switch (Forward/Reverse)
- On/Off Trigger with Speed Control
- Lock-on Button (for continuous operation)

Ofbylding 1: Oerview of the Einhell TC-RH 800 E Rotary Hammer.

Figure 2: The rotary hammer in use, demonstrating its application for drilling into a wall.

figuer 3: Close-up view of the SDS Plus chuck, designed for quick and secure bit changes.
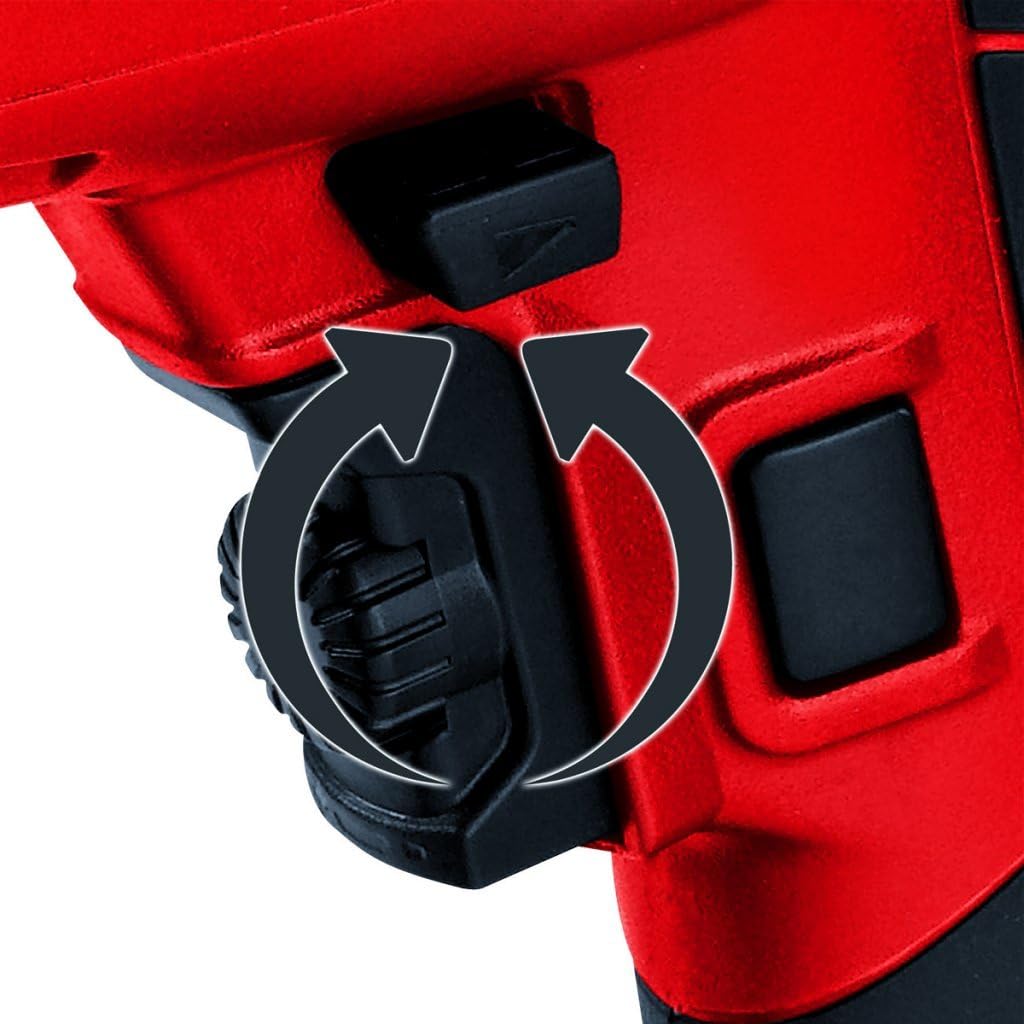
Figure 4: Detail of the rotation direction switch, allowing selection between forward and reverse rotation.

Figure 5: The ergonomic main handle designed for comfortable and secure grip.

Figure 6: The adjustable depth stop, used to set a precise drilling depth.

Figure 7: Einhell brand logo prominently displayed on the tool body, indicating authenticity.
4. Opsette
4.1 De helphendel befestigje
The auxiliary handle provides additional grip and control. Loosen the auxiliary handle by turning it counter-clockwise. Slide it onto the tool body to the desired position and tighten it clockwise.
4.2 Ynstallearjen fan de djiptestop
Insert the depth stop rod into the designated hole on the auxiliary handle. Adjust the depth stop to the required drilling depth by sliding it in or out. Secure it by tightening the auxiliary handle.

Figure 8: The SDS Plus chuck with the depth stop rod correctly installed.
4.3 Inserting SDS Plus Drill Bits/Chisels
- Clean the shank of the drill bit or chisel and apply a thin layer of grease.
- Pull back the chuck sleeve and insert the bit into the chuck, rotating it slightly until it engages.
- Release the chuck sleeve. Pull the bit to check if it is securely locked. The bit should have a small amount of axial play, which is normal for SDS Plus systems.
5. Bedriuwsinstruksjes
5.1 Mode Seleksje
The mode selector switch allows you to choose the appropriate operating mode:
- Boarjen (allinich rotaasje): For drilling in wood, metal, or plastics.
- Hammer Drilling (Rotation with Impact): For drilling in concrete and masonry.
- Chiseling (Impact Only): For light chiseling work, such as removing tiles or plaster.
To change the mode, rotate the selector switch to the desired symbol. Ensure the tool is unplugged before changing modes, especially for chiseling, to prevent accidental activation.
5.2 Yn-/útskeakelje en snelheidsregeling
Press the On/Off trigger to start the tool. The speed is variable depending on how far you press the trigger. For continuous operation, press the lock-on button while the trigger is fully depressed. To switch off, release the trigger or press it again if the lock-on button is engaged.
5.3 Rotaasjerjochting
Use the rotation direction switch (Figure 4) to select forward or reverse rotation. Forward rotation is for drilling and hammer drilling. Reverse rotation is primarily for unscrewing or freeing jammed drill bits. Change the rotation direction only when the tool is switched off.
6. Underhâld
Regelmjittich ûnderhâld soarget foar de lange libbensdoer en optimale prestaasjes fan jo rotearjende hammer.
- Reiniging: Keep the ventilation slots clean to prevent overheating. Wipe the tool housing with a soft, damp doek. Brûk gjin hurde reinigingsmiddels of solvents.
- Chuck ûnderhâld: Regularly clean the SDS Plus chuck and apply a small amount of special grease to the bit shanks to ensure smooth operation and prevent wear.
- Cord ynspeksje: Periodically inspect the power cord for any damage. If damaged, have it replaced by a qualified technician.
- Opslach: Store the tool in its original case in a dry, secure place, out of reach of children.
7. Probleemoplossing
| Probleem | Mooglike oarsaak | Oplossing |
|---|---|---|
| Tool begjint net. | Gjin stroomfoarsjenning. Stromkabel skansearre. Oan/út-skeakel defekt. | Kontrolearje it stopkontakt en de stroomûnderbreker. Have cord replaced by a qualified technician. Kontakt klant stipe. |
| Fermindere boar-/hamerprestaasjes. | Worn drill bit/chisel. Ferkearde modus selektearre. Chuck dirty or dry. | Replace with a sharp, appropriate bit. Selektearje de juste bestjoeringsmodus. Clean and grease the chuck and bit shank. |
| It ark rekket te waarm. | Ferstoppe fentilaasje-sloten. Oerladen fan it ark. | Meitsje de fentilaasjegaten skjin. Reduce pressure and allow the tool to cool. Avoid continuous heavy use. |
8. Technyske spesifikaasjes
| Eigenskip | Spesifikaasje |
|---|---|
| Merk | Einhell |
| Model Number | TC-RH 800 E (4257920) |
| Power Boarne | Corded elektryske |
| Maksimum Power | 800 W |
| Impact Energy | 2.5 J |
| Voltage | 230 V |
| Aktuele yntensiteit | 3.33 A |
| Maksimale rotaasjesnelheid | 1000 RPM |
| Ympaktrate | 5180 BPM |
| Chuck Type | SDS Plus |
| Maksimum Chuck Grutte | 26 mm |
| Boarkapasiteit (beton) | 26 mm |
| Boarkapasiteit (hout) | 26 mm |
| Boarkapasiteit (metaal) | 26 mm |
| Maksimum koppel | 30 Nm |
| Oantal snelheden | 1 |
| Produkt Ofmjittings (L x B x H) | 40 x 10.5 x 35.5 sm |
| Item Gewicht | 3.27 kg |
| Kleur | Read |
| Materiaal Type | Metaal, Plastic |
| Ynbegrepen komponinten | Carrying case, Depth stop |
9. Warranty Information
Einhell products are manufactured to high-quality standards and are subject to strict quality controls. This product is covered by the manufacturer's warranty in accordance with the country-specific legal provisions. For detailed warranty terms and conditions, please refer to the warranty card included with your product or visit the official Einhell website.
10. Stipe
Should you have any questions regarding the operation, maintenance, or troubleshooting of your Einhell TC-RH 800 E Rotary Hammer, please contact Einhell customer service or visit our official webside foar fierdere help en boarnen.
Offisjeel Website: www.einhell.com