
1. Produkt Overview
The GM Lighting LumenTask X8-120-WH is an 8-inch, 120V Xenon undercabinet fixture designed to provide high-intensity, low-maintenance lighting. It features a sleek white finish and a tempered frosted prismatic glass lens for optimal light distribution. The fixture includes an anodized aluminum reflector for maximum illumination and a Hi-Low-Off switch for adjustable lighting levels. Its unique 'Open Wide' hinged system allows for hands-free re-lamping and maintenance.
Key Features:
- 8 inches long x 4.75 inches wide x 1.375 inches high.
- Includes one (1) 35W G9 base 120V Xenon lamp.
- White finish with tempered frosted, prismatic glass lens.
- Hi-Low-Off switch for full or 50% lighting level.
- UL rated for dry, indoor locations.
- Anodized aluminum reflector for maximum light distribution.
- 'Open Wide' hinged system for easy access and maintenance.
2. Safety Information
Lês en begryp alle ynstruksjes foardat jo dit apparaat ynstallearje of brûke. It net folgjen fan dizze ynstruksjes kin liede ta elektryske skokken, brân of oare gefaren.
- WARSKÔGING: Risiko op elektryske skok. Skeakelje de stroom út by de zekering of stroomûnderbrekker foardat jo ynstallearje of ûnderhâld dogge.
- Dizze fixture is bedoeld foar allinnich binnen gebrûk in dry locations. Do not expose to water or moisture.
- BELANGRYK: This fixture requires hardwiring directly to available wiring. An optional CP-6 (72-inch cord and plug) is available for separate purchase if hardwiring is not feasible.
- FENTILATION: The fixture must be installed a minimum of 2 inches from the back of the cabinet to allow for proper ventilation and prevent overheating.
- Ensure all electrical connections are made in accordance with local codes and ordinances. If you are unsure about wiring, consult a qualified electrician.
- Do not operate the fixture with a damaged cord or if the housing is compromised.
3. Package Ynhâld
Kontrolearje oft alle ûnderdielen oanwêzich binne foardat jo begjinne mei de ynstallaasje.
- 1 x LumenTask X8-120-WH Undercabinet Fixture
- 1 x 35W G9 Base 120V Xenon Lamp
- Ynstruksjeblêd
4. Opset en ynstallaasje
Before installation, ensure power is disconnected at the circuit breaker. This fixture is designed for hardwired installation.
4.1 Fixture Dimensions and Features
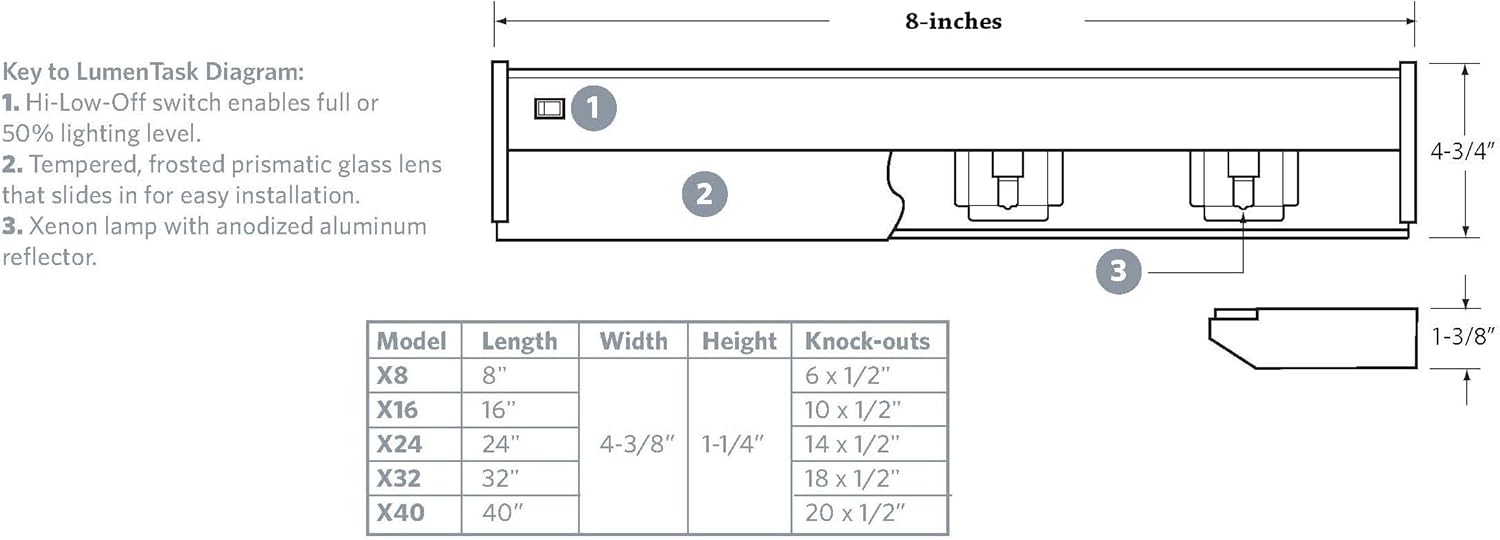
Ofbylding 1: This diagram illustrates the overall dimensions of the 8-inch LumenTask fixture, including its length (8 inches), width (4-3/4 inches), and height (1-3/8 inches). It also highlights key features such as the Hi-Low-Off switch, the frosted prismatic glass lens, and the Xenon lamp with an anodized aluminum reflector. A table provides dimensions for other LumenTask models (X8, X16, X24, X32, X40).
4.2 Detaillearre komponint View
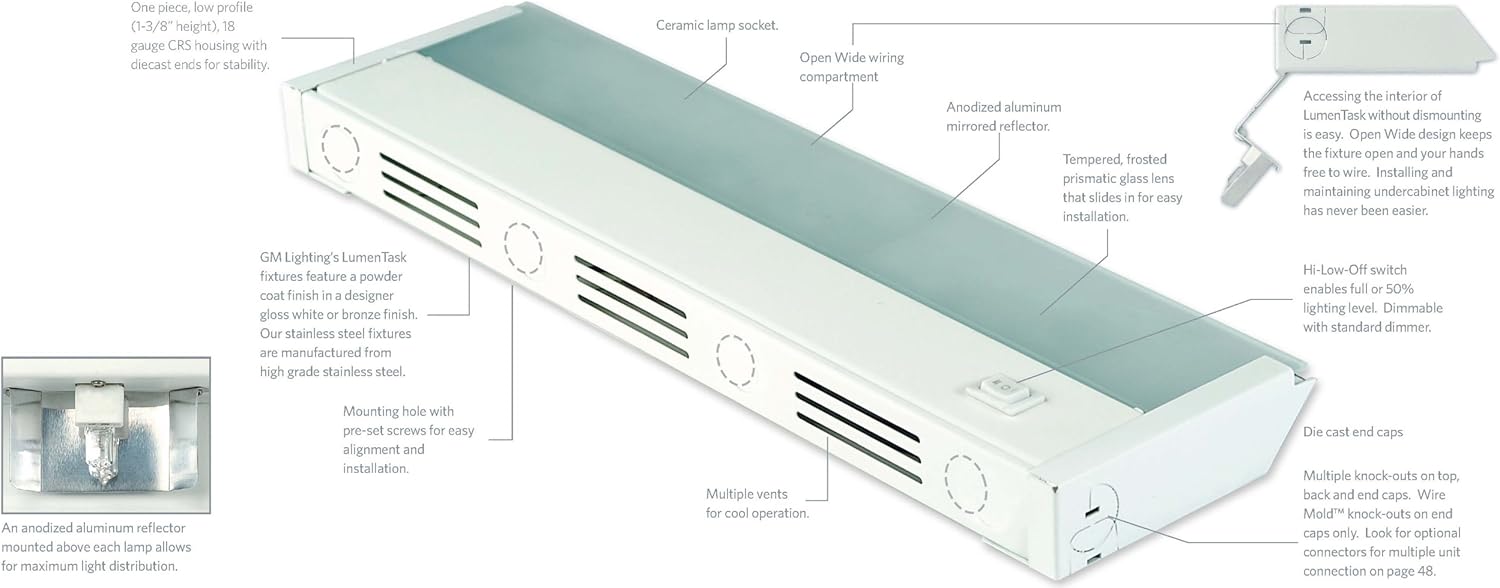
Ofbylding 2: Dit detaillearre view shows the internal and external components of the LumenTask fixture. It points out the ceramic lamp socket, 'Open Wide' wiring compartment, anodized aluminum mirrored reflector, tempered frosted prismatic glass lens, Hi-Low-Off switch, die-cast end caps, multiple vents for cooling, and mounting holes with pre-set screws. It also describes the one-piece, low-profile CRS housing with die-cast ends for stability.
4.3 Accessing the Interior for Wiring
The LumenTask fixture features an 'Open Wide' design for easy access to the wiring compartment without dismounting the fixture. This allows for hands-free wiring and maintenance.
- To open, simply depress the wire compartment holding tab.
- The wiring compartment cover will swing down and out, staying in position.
- Make necessary electrical connections.
- Once wiring is complete, snap the cover back into its closed position.
- Slide the lens back into place.
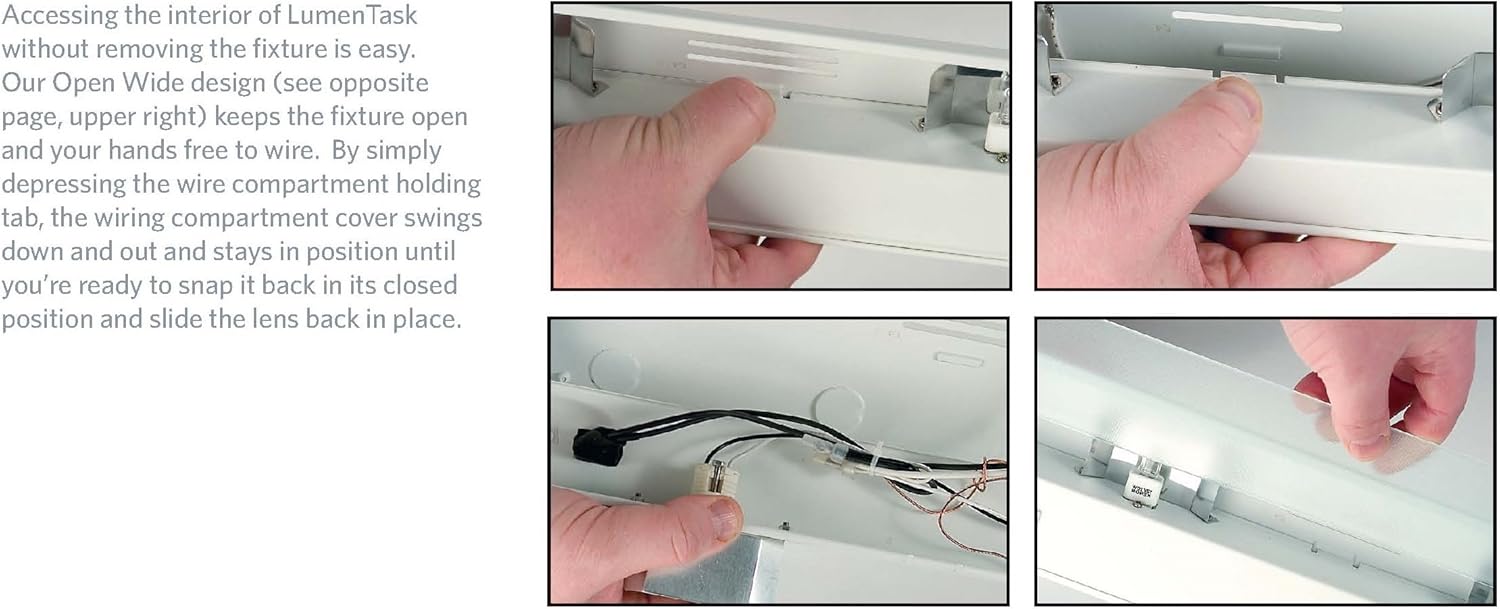
Ofbylding 3: This series of images demonstrates the process of accessing the interior of the LumenTask fixture. It shows how to depress the tab to open the wiring compartment, revealing the internal wiring, and how to slide the lens back into position after maintenance or wiring.
4.4 Montage
- Identify the mounting holes with pre-set screws on the fixture.
- Position the fixture under the cabinet, ensuring the 2-inch ventilation clearance from the back of the cabinet.
- Secure the fixture using appropriate screws (not included) through the mounting holes.
- Wire mold knock-outs on the end caps are provided for through-wiring multiple units using Lumen Task EZ Connectors (sold separately).
5. Bedriuwsinstruksjes
Once installed and powered, the LumenTask fixture is ready for operation.
- Power On/Off: Use the integrated Hi-Low-Off rocker switch located on the fixture to turn the light on or off.
- Oanpassing fan helderheid: The Hi-Low-Off switch also allows you to select between full brightness ('Hi') and 50% brightness ('Low').
- Dimjen: The fixture can be dimmed remotely by a standard incandescent dimmer (sold separately) if connected to a dimmable circuit.
6. Underhâld
Regular maintenance ensures optimal performance and longevity of your LumenTask fixture.
6.1 Lamp Ferfanging
The Xenon lamp has a rated average life of 5,000 hours. When replacement is needed:
- Strom útskeakelje: Always turn off power to the fixture at the circuit breaker before replacing the lamp.
- Tagong ynterieur: Use the 'Open Wide' hinged system to access the lamp compartment (refer to Section 4.3).
- Alde L fuortsmiteamp: Carefully remove the old 35W G9 base Xenon lamp from its ceramic socket. Allow the lamp to cool if it has been recently in use.
- Nije L ynstallearjeamp: Insert a new 35W G9 base 120V Xenon lamp into the socket. Avoid touching the new lamp with bare hands; use a cloth or glove to prevent oil residue.
- Close Fixture: Close the wiring compartment cover and slide the lens back into place.
- Kracht werstelle: Weromsette macht by de circuit breaker.
6.2 Cleaning
- Ensure the fixture is off and cool before cleaning.
- Wiskje de bûtenste oerflakken mei in sêfte, droege doek.
- Brûk foar koppige merken in wat damp doek mei mylde sjippe, en dan droechwrijven.
- Brûk gjin abrasive reinigingsmiddelen of oplosmiddels, om't dizze de finish of lens beskeadigje kinne.
7. Probleemoplossing
If you encounter issues with your LumenTask fixture, refer to the following common problems and solutions:
| Probleem | Mooglike oarsaak | Oplossing |
|---|---|---|
| Ljocht docht net oan. | Gjin macht foar it fixture. | Kontrolearje de stroomûnderbrekker en muorreskeakel. Soargje derfoar dat alle bedrading goed fêst sit. |
| Ljocht flikkert of is dim. | Los lamp or faulty lamp. | Soargje derfoar dat de lamp is securely seated. Replace the lamp if it is old or appears faulty. |
| De fitting wurdt te waarm. | Net genôch fentilaasje. | Verify that there is at least 2 inches of clearance from the back of the cabinet for proper airflow. |
| Dimfunksje wurket net. | Incompatible dimmer or incorrect wiring. | Ensure an incandescent dimmer is used. Check dimmer wiring. |
If troubleshooting steps do not resolve the issue, contact GM Lighting customer support.
8. Spesifikaasjes
| Spesifikaasje | Detail |
|---|---|
| Model Number | X8-120-WH |
| Ofmjittings (L x B x H) | 8 x 4.75 x 1.38 inch |
| Item Gewicht | 1.15 pyk |
| Voltage | 120 Volt |
| Wattage | 35 watt |
| Ljocht boarne Type | Xenon (G9 base) |
| Oantal ljocht boarnen | 1 |
| Kleur Temperatuer | 2900 Kelvin |
| Finish Type | Wyt |
| Shade Materiaal | Aluminium, glês |
| Switch Type | Hi-Low-Off Rocker Switch |
| Control Metoade | Remote (via dimmer) |
| Binnen / bûtengebrûk | Allinnich gebrûk binnen |
| Mounting Type | Undercabinet |
| Special Feature | Requires 2-inch minimum clearance for ventilation. Hardwired installation. |
9. Garânsje en stipe
GM Lighting is committed to quality and customer satisfaction. While specific warranty details are not provided in this document, GM Lighting products are designed with durability in mind.
For technical assistance, layout guidance, or installation support, please contact GM Lighting's technical staff. Refer to the product packaging or GM Lighting's official webside foar aktuele kontaktgegevens.