1. Wichtige Safety Ynstruksjes
To reduce the risk of fire, electric shock, or injury, always follow these basic safety precautions when using your Arctic-Pro Portable Digital Ice Maker Machine:
- Lês alle ynstruksjes foar gebrûk.
- Net oanreitsje waarme oerflakken. Brûk handgrepen of knoppen.
- To protect against electrical hazards, do not immerse cord, plug, or any part of the appliance in water or other liquids.
- Nauwe tafersjoch is nedich as elk apparaat wurdt brûkt troch of tichtby bern.
- Trek de stekker út it stopkontakt as net yn gebrûk en foar skjinmeitsjen. Lit ôfkuolje foardat jo dielen oan- of ôfnimme, en foardat jo it apparaat skjinmeitsje.
- Brûk gjin apparaat mei in beskeadige snoer of stekker, of nei't it apparaat net goed wurket of op ien of oare manier beskeadige is. Nim kontakt op mei de klanttsjinst foar ûndersyk, reparaasje of oanpassing.
- It brûken fan taheaksels dy't net oanrikkemandearre binne troch de fabrikant fan it apparaat kin gefaren feroarsaakje.
- Brûk net bûten.
- Lit it snoer net oer de râne fan tafel of oanrjocht hingje, of oanreitsje waarme oerflakken.
- Net pleatse op of tichtby in heule gas- of elektryske burner, of yn in ferwaarme oven.
- Stek de stekker altyd earst yn it apparaat, en stek dan it snoer yn it stopkontakt. Om de stekker los te meitsjen, set in knop op "út" en helje dan de stekker út it stopkontakt.
- Brûk it apparaat net foar oars as bedoeld húshâldlik gebrûk.
- Dit apparaat is allinich foar húshâldlik gebrûk.
- Brûk gjin korrosive gemikaliën as dampen yn dit apparaat.
- This ice maker must be grounded.
- Trochkûlje gjin buis mei koelmiddel.
2. Produkt Overview
The Arctic-Pro Portable Digital Ice Maker Machine is designed to produce ice quickly and efficiently. It features a compact design suitable for various settings.
2.1 komponinten
- Iismakker-ienheid
- Útnimbere Ice Basket
- Iisskep
- Power Cord (3-prong plug)
2.2 Features
- Digitaal skerm: An easy-to-read LCD control panel for selecting ice size, setting timers, and controlling cleaning functions.
- Klear View Window Lid: Maakt observaasje fan it iismeitsjen mooglik.
- Fill Sensor: Detects water level to ensure proper operation.
- Intelligente sensoren: Prevents the ice basket from overfilling.
- Twa iisblokjesgrutte: Choose between small (0.75 x 0.75 inches) and large (1 x 0.75 inches) ice cubes.
- Snelle iisproduksje: Produces first batch of ice in 6-8 minutes.
- Deistige kapasiteit: Yn steat om oant 26 pûn iis per dei te produsearjen.
- Enhanced Cooling System: Features a fan for efficient heat dissipation.

Figure 1: Key features and components of the ice maker.
Figuer 2: Iisproduksjemooglikheden.
3. Setup Ynstruksjes
3.1 Útpakke
- Fuortsmite alle ferpakking materialen út de ienheid.
- Inspect the ice maker for any damage. If damaged, do not operate and contact customer service.
- Helje de iismand en iisskep út 'e binnenkant fan it apparaat.
3.2 Initial Cleaning
Before first use, clean the interior of the ice maker:
- Waskje de iismand en iisskep mei waarm wetter en in myld reinigingsmiddel. Spoel goed ôf.
- Reinigje it ynterieur fan 'e iismakker mei in sêft doek dampened with warm water and a small amount of vinegar or mild detergent. Rinse with clean water and drain.
- Soargje derfoar dat alle dielen droech binne foardat jo opnij ynstalleare.
3.3 Pleatsing
- Plak de iismakker op in stabyl, flak oerflak, fuort fan direkt sinneljocht en waarmteboarnen.
- Ensure there is adequate ventilation around the unit, especially at the back and sides where the cooling fan is located.
- Tastean op syn minst 4 inch romte om 'e ienheid foar goede luchtsirkulaasje.
3.4 Stromferbining
- Plug the 3-prong power cord into a grounded electrical outlet (115V, 60Hz).
- Allow the unit to rest for at least one hour before adding water and operating, especially if it was tilted during transport.
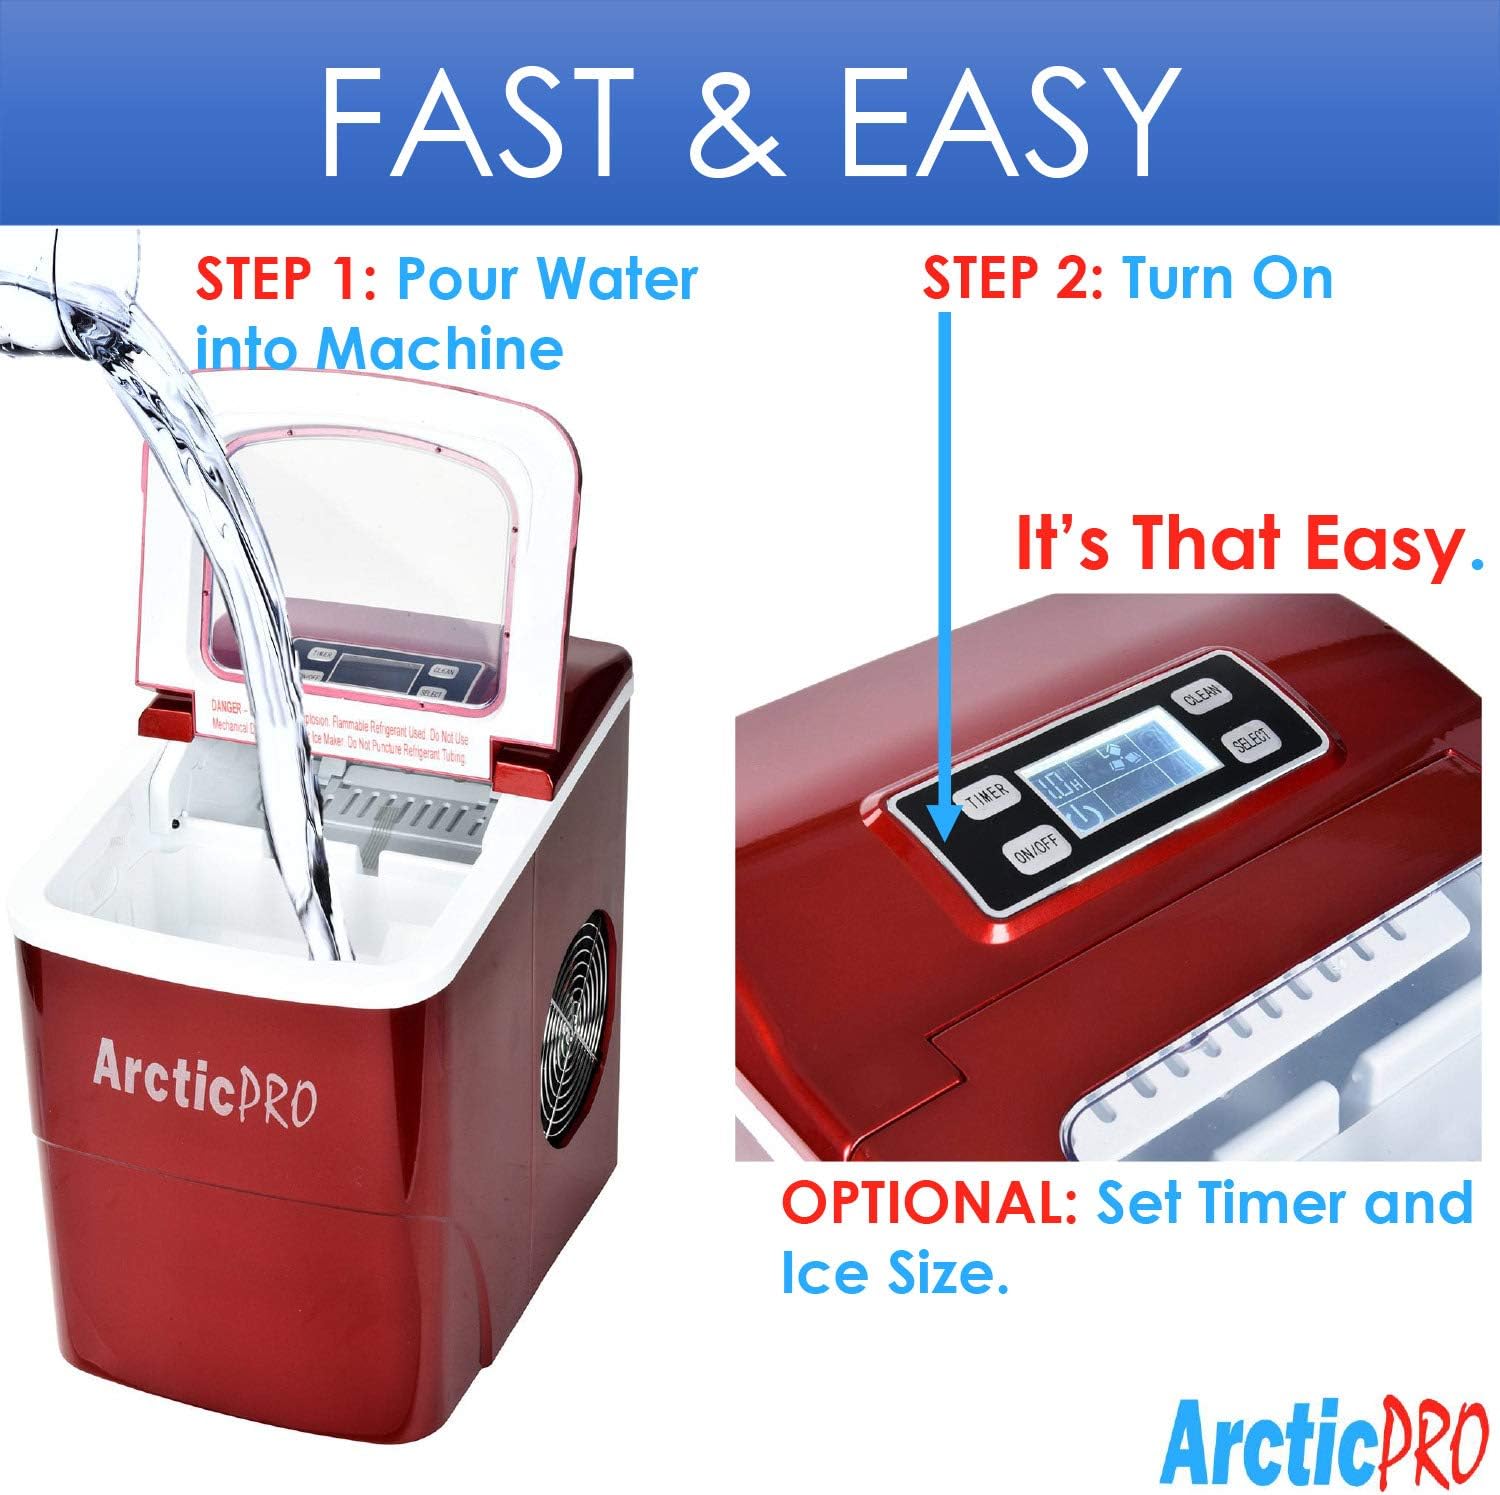
4. Bedriuwsinstruksjes
Operating your Arctic-Pro ice maker is a simple two-step process:

Figure 3: Simple operating steps.
4.1 Wetter tafoegje
- Iepenje it deksel fan 'e iismakker.
- Pour potable water into the water reservoir. Do not exceed the 'MAX FILL LINE' indicated inside the reservoir.
- Slút it deksel.

Video 1: Demonstrates adding water to the ice maker. Note: This video is a customer-generated preview and may not represent official instructions.
4.2 Begjinne mei iisproduksje
- Druk op de ON/OFF button on the digital control panel to turn on the unit.
- Brûk de SELECT button to choose your desired ice cube size: Small (S) or Large (L). The selected size will be indicated on the digital screen.
- The ice maker will begin its cycle. The first batch of ice cubes will typically be ready in 6-8 minutes.
4.3 Yndikatoaren
- ICE FULL: An indicator light or message on the digital screen will illuminate when the ice basket is full. The unit will automatically pause ice production. Remove ice from the basket to resume production.
- WATER Foegje: An indicator light or message will illuminate when the water reservoir is low. Add water to the reservoir to resume ice production.
4.4 Timer Function (Optional)
The digital screen allows you to set a timer for operation. Refer to the specific instructions in your product packaging for detailed timer setup.
5. Underhâld en Cleaning
Regelmjittich skjinmeitsjen en ûnderhâld soargje foar optimale prestaasjes en in lange libbensdoer fan jo iismakker.
5.1 Daily Cleaning
- After each use, unplug the unit.
- Remove the ice basket and empty any remaining ice.
- Drain any remaining water from the reservoir using the drain plug located at the bottom of the unit.
- Wipe the interior with a soft cloth.
5.2 Wyklikse Cleaning
- Perform the daily cleaning steps.
- Prepare a solution of warm water and a small amount of white vinegar or a food-grade ice maker cleaner.
- Pour the solution into the water reservoir and allow it to sit for 10-15 minutes.
- Drain de oplossing folslein.
- Rinse the reservoir thoroughly with clean water multiple times to remove any residue.
- Wipe de bûtenkant mei in sêft, damp doek.
5.3 Opslach
As de iismakker foar in langere perioade opslein wurdt:
- Ensure the unit is thoroughly cleaned and completely dry.
- Leave the lid slightly ajar to prevent mold and mildew growth.
- Bewarje yn in koel, droech plak.
6. Probleemoplossing
Review de folgjende faak foarkommende problemen en oplossingen foardat jo kontakt opnimme mei klanttsjinst.
| Probleem | Mooglike oarsaak | Oplossing |
|---|---|---|
| Iismakker giet net oan | Gjin stroomfoarsjenning | Check if the power cord is securely plugged into a grounded outlet. Test the outlet with another appliance. |
| Gjin iisproduksje | Lack of water in reservoir | Add water to the reservoir up to the MAX FILL LINE. |
| Omjouwingstemperatuer te heech | Ensure the ice maker is in a cool environment and not exposed to direct sunlight or heat sources. | |
| Air circulation blocked | Ensure adequate space around the unit for ventilation. Clean any dust from the fan vents. | |
| Iisblokjes binne te lyts of te bewolkt | Wettertemperatuer te heech | Use colder water when filling the reservoir. |
| Opbou fan mineralen | Perform a thorough cleaning and descaling as per maintenance instructions. Use filtered water. | |
| "ICE FOLL" yndikator is oan, mar de koer is net fol | Ice blocking sensor | Rearrange ice in the basket or remove some ice to clear the sensor path. |
| Ungewoane lûd ûnder operaasje | Normale operaasje klinkt | Some gurgling or fan noise is normal. If the noise is excessive or unusual, contact customer service. |
7. Spesifikaasjes
| Eigenskip | Spesifikaasje |
|---|---|
| Model Namme | Portable Ice Maker Machine |
| Model Number | 21738 |
| Ofmjittings (D x B x H) | 11.5" x 8.75" x 12.5" |
| Deistige iisproduksjekapasiteit | Oant 26 pûn |
| First Ice Production Time | 6-8 minuten |
| Ice Cube maten | Small (0.75"x0.75"), Large (1"x0.75") |
| Wattage | 100 watt |
| Voltage | 115 Volt |
| Noise Level | 45 Desibel |
| Materiaal | Plestik |
| Ynbegrepen komponinten | Ice Maker, Ice Basket, Small Ice Scoop |

Figuer 4: Produktôfmjittings.
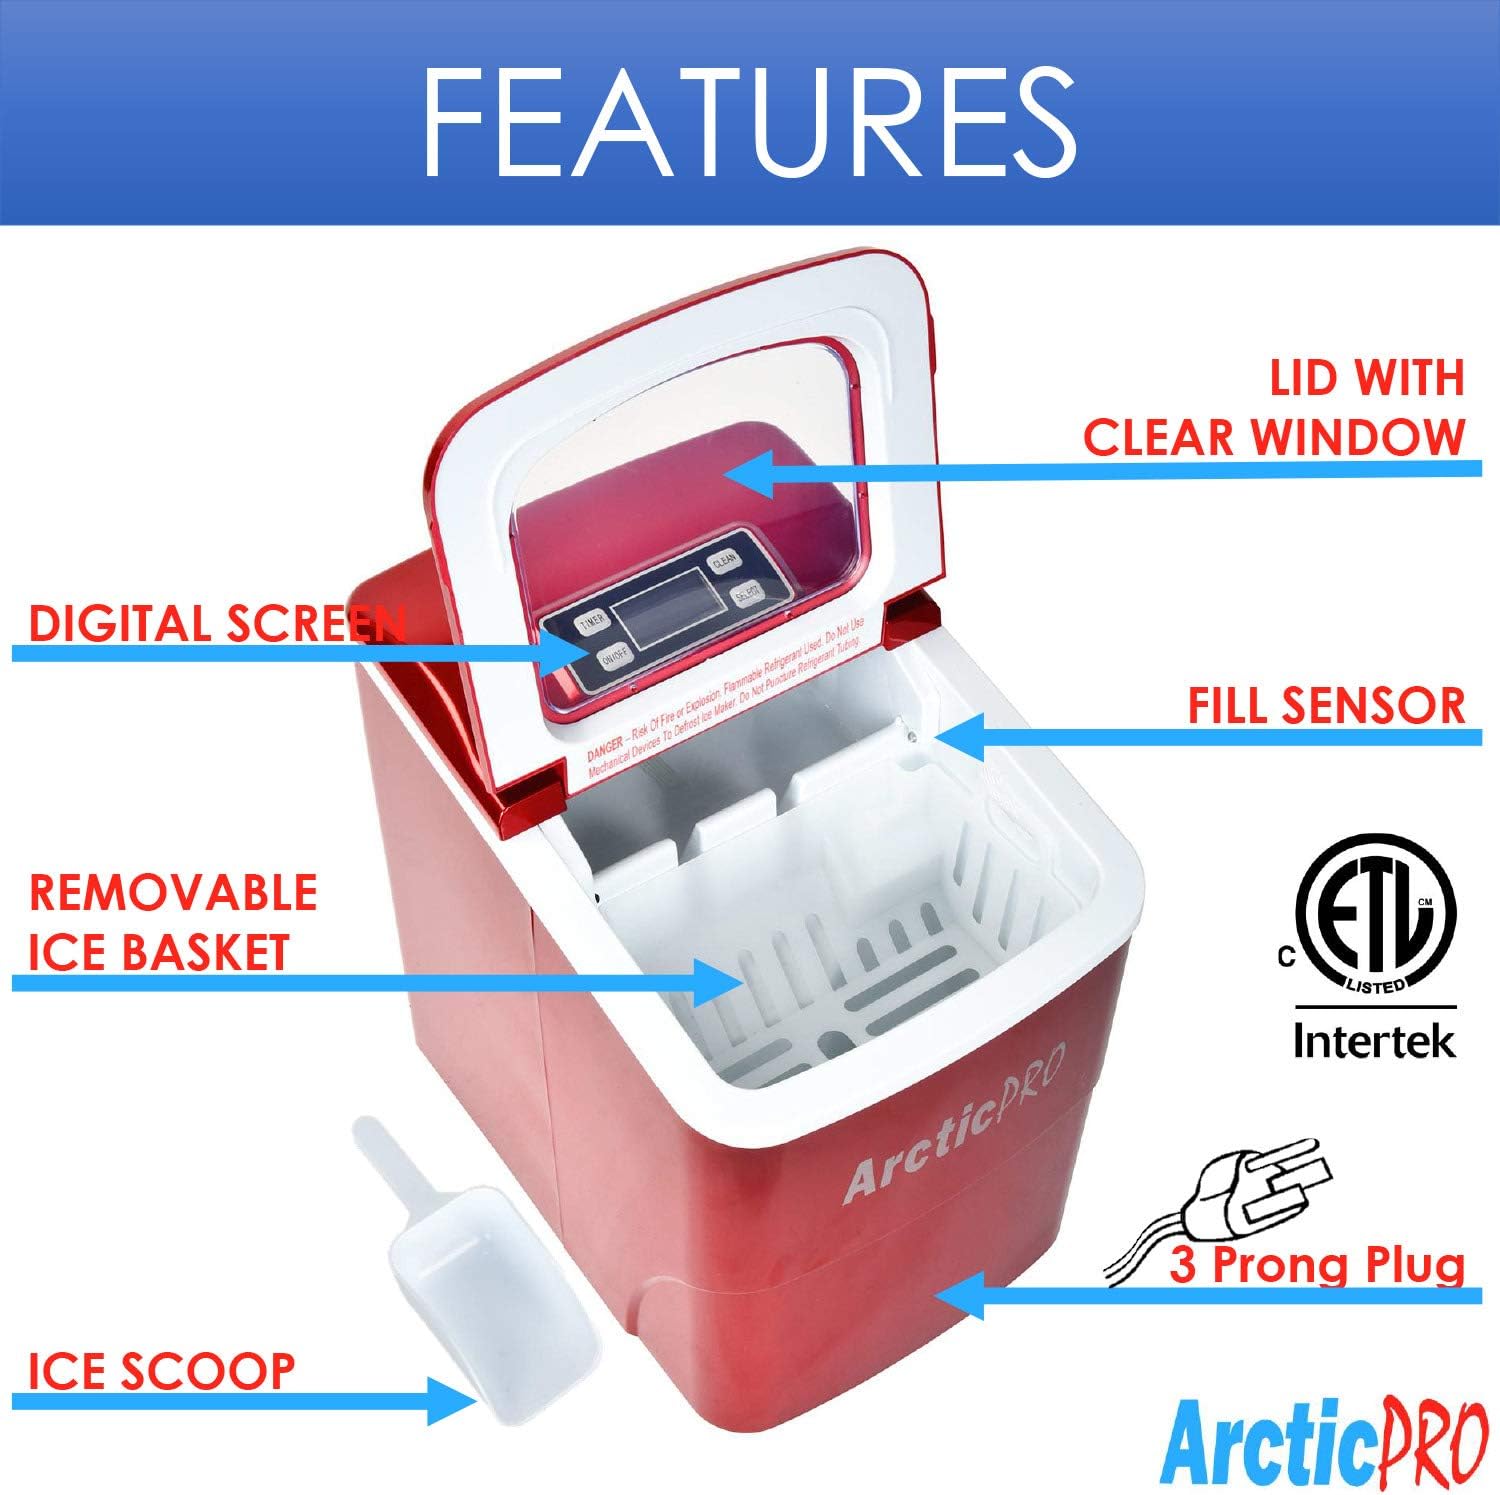
Figure 5: Ice cube size comparison.
8. Garânsje en klantestipe
Arctic-Pro products are manufactured to high-quality standards. For warranty information, product registration, or technical assistance, please refer to the warranty card included with your purchase or visit the official Arctic-Pro website.
If you encounter any issues not covered in this manual, please contact Arctic-Pro customer support for further assistance.