
1. Ynlieding
Welcome to the user manual for your AAXA LED Pico Micro Video Projector. This compact and versatile projector is designed for personal media sharing, business presentations, and home cinema experiences. This manual provides detailed instructions on setting up, operating, maintaining, and troubleshooting your device to ensure optimal performance.
Pakketynhâld
Kontrolearje asjebleaft oft alle items yn jo pakket oanwêzich binne:
- AAXA LED Pico Mikro fideoprojektor
- USB Kabel
- AV kabel
- Mini Tripod (optional, may vary by package)
- Power Adapter (not explicitly listed but implied for charging)
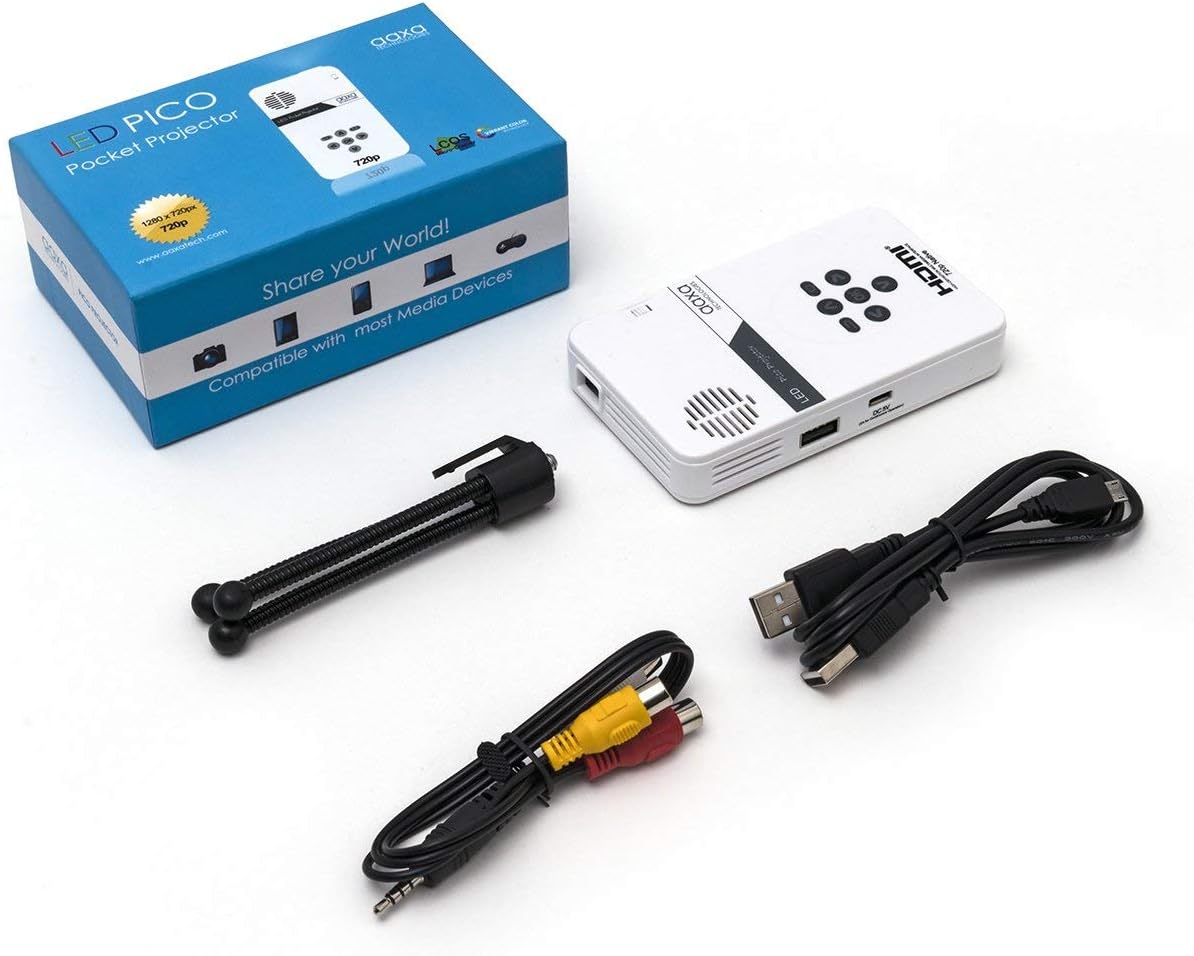
Figure 1: Package contents including the projector, cables, and tripod.
2. Produkt Overview
The AAXA LED Pico Micro Video Projector is a compact device featuring a user-friendly interface and multiple connectivity options. It is designed for portability and ease of use.
Key Features:
- Ultra Bright 25 Lumens LED light source with 15,000-hour lifespan.
- High Definition 720p (1280x720) native resolution, supporting up to 1080p input.
- Vibrant Color Technology for rich and accurate colors.
- Built-in 80-minute rechargeable Lithium-ion battery.
- Integrated media player and speakers.
- Compact and lightweight design (4.25 x 2.36 x 0.7 inches, 6.3 ounces).
Kontrôles en havens:
Familiarize yourself with the various controls and connection ports on your projector:

figuer 2: Top view of the projector with navigation buttons (Up, Down, Left, Right, OK, Menu, Back) and speaker grille.
- Navigaasjeknoppen: Brûkt om troch menu's te navigearjen en opsjes te selektearjen.
- Speaker Grille: For audio output from the built-in speakers.
- Focus Wheel: Located on the side, used to adjust image clarity.

figuer 3: Front view of the projector showing the HDMI, AV, and 3.5mm audio out ports.
- HDMI -ynfier: Ferbine mei laptops, gamingkonsoles of oare apparaten mei HDMI-ynskeakele ferbining.
- AV-ynfier: Foar it ferbinen fan âldere apparaten mei de ynbegrepen AV-kabel.
- 3.5mm Audio Out: Ferbine eksterne koptelefoanen of sprekkers.

figuer 4: Side view of the projector showing the USB port and DC 5V charging port.
- USB-poarte: Foar it ferbinen fan USB-skiven foar it ôfspyljen fan media.
- DC 5V Ynfier: Power input for charging the internal battery.

figuer 5: Side view of the projector showing the TF Card slot.
- Micro SD (TF Card) Slot: Insert a Micro SD card (up to 16GB) for media playback.
3. Opsette
3.1 Yn-/útskeakelje en opladen
- Opladen: Connect the supplied micro USB cable to the DC 5V input on the projector and a compatible USB power source. The LED indicator will show charging status.
- Power On: Press and hold the power button (usually located near the focus wheel or on the top panel) until the projector powers on.
- Útskeakelje: Press and hold the power button again until the projector shuts down.
3.2 Positioning the Projector
Place the projector on a stable, flat surface. For optimal image quality, project onto a smooth, light-colored wall or a dedicated projector screen. The distance from the surface will determine the image size.

Figure 6: The projector can be mounted on a tripod for stable positioning and angle adjustment.
3.3 Fokus oanpasse
To achieve a clear image, rotate the focus wheel located on the side of the projector until the projected image appears sharp and in focus.
4. Bedriuwsinstruksjes
4.1 Ferbine apparaten
- HDMI: Connect an HDMI cable from your source device (laptop, game console, etc.) to the HDMI input port on the projector. Select HDMI as the input source in the projector's menu.
- FAN: Use the provided AV cable to connect to devices with composite video and audio outputs. Select AV as the input source.
- USB/Micro SD: Insert a USB flash drive into the USB port or a Micro SD card into the TF Card slot. The projector's media player interface will typically appear, allowing you to browse and play files.
4.2 Mediaôfspieljen
The built-in media player supports various video, music, and picture formats. Use the navigation buttons on the projector to browse files and select content for playback.
4.3 Audio Utfier
The projector has built-in speakers. For private listening or enhanced audio, connect headphones or external speakers to the 3.5mm Audio Out port.
5. Underhâld
- Reiniging: Use a soft, dry cloth to clean the exterior of the projector. For the lens, use a lens cleaning cloth and specialized lens cleaning solution. Do not use abrasive cleaners.
- Opslach: As de projektor net yn gebrûk is, bewarje dy dan op in koel, droech plak, fuort fan direkt sinneljocht en ekstreme temperatueren.
- Batterij soarch: To prolong battery life, avoid fully discharging the battery frequently. Charge the projector regularly, even if not in active use.
6. Probleemoplossing
| Probleem | Mooglike oarsaak | Oplossing |
|---|---|---|
| Gjin ôfbylding projektearre | Projector not powered on; incorrect input source; loose cable connection. | Ensure projector is on and charged. Select correct input source (HDMI, AV, USB/SD). Check all cable connections. |
| Ofbylding is wazig | Focus not adjusted; projector too close/far from surface. | Adjust the focus wheel until the image is clear. Adjust the distance of the projector from the projection surface. |
| Gjin lûd | Volume too low; external audio device connected; audio format not supported. | Increase volume. Disconnect external audio devices if using internal speakers. Ensure audio format is supported. |
| Projektor slút ûnferwachts út | Low battery; overheating. | Charge the battery. Ensure proper ventilation and clear any obstructions from vents. |
7. Spesifikaasjes
| Eigenskip | Detail |
|---|---|
| Merk | AAXA Technologies |
| Model Number | KP-101-01-cr |
| Display Resolúsje | 1280 x 720 (Native), Max 1080p Input |
| Helderheid | 25 Lumens |
| Ljocht Boarne Life | 15,000 oeren (LED) |
| Konnektivität Technology | HDMI, USB, Micro SD, 3.5mm Aux Out, Composite AV |
| Batterij Life | Up to 80 minutes (Lithium-Ion) |
| Produkt Ofmjittings | 4.25 x 2.36 x 0.7 inch |
| Item Gewicht | 6.3 oz |
| Oanrikkemandearre Uses | Bedriuw, Underwiis, Thúsbioskoop |
8. Garânsje en stipe
This product is offered as an Amazon Renewed item, which means it has been professionally inspected and tested to work and look like new. Amazon Renewed products are eligible for replacement or refund under the Amazon Renewed Guarantee if you are not satisfied with your purchase.
For further assistance or technical support, please refer to the official AAXA Technologies webside of nim direkt kontakt op mei har klanttsjinst.