1. Ynlieding
The Zoom GCE-3 is a compact USB Audio Interface designed to provide access to an extensive collection of guitar and bass effects, amplifiers, and cabinets through the Zoom Guitar Lab software. This device integrates a powerful Digital Signal Processor (DSP) to offload processing from your computer, ensuring low-latency performance for recording and practice. This manual provides essential information for setting up, operating, and maintaining your GCE-3 unit.
2. Produkt Overview
2.1 Key Features
- Palm-sized audio interface with free download of Zoom Guitar Lab Mac/Windows software.
- Access to dozens of high-quality guitar effects and artist patches.
- Built-in DSP for circuit emulation of Zoom G-Series and B-Series pedals.
- USB-C port for connection to computer.
- Standard Guitar input, Aux input, and stereo headphone output with volume control.
2.2 Wat sit der yn 'e doaze
- Zoom GCE-3 Compact USB Audio Interface
- Steinberg Cubase LE license
- Non-slip pad
- USB -kabel (Type A oant C)
- Hânlieding (dit dokumint)
2.3 Produkt Views
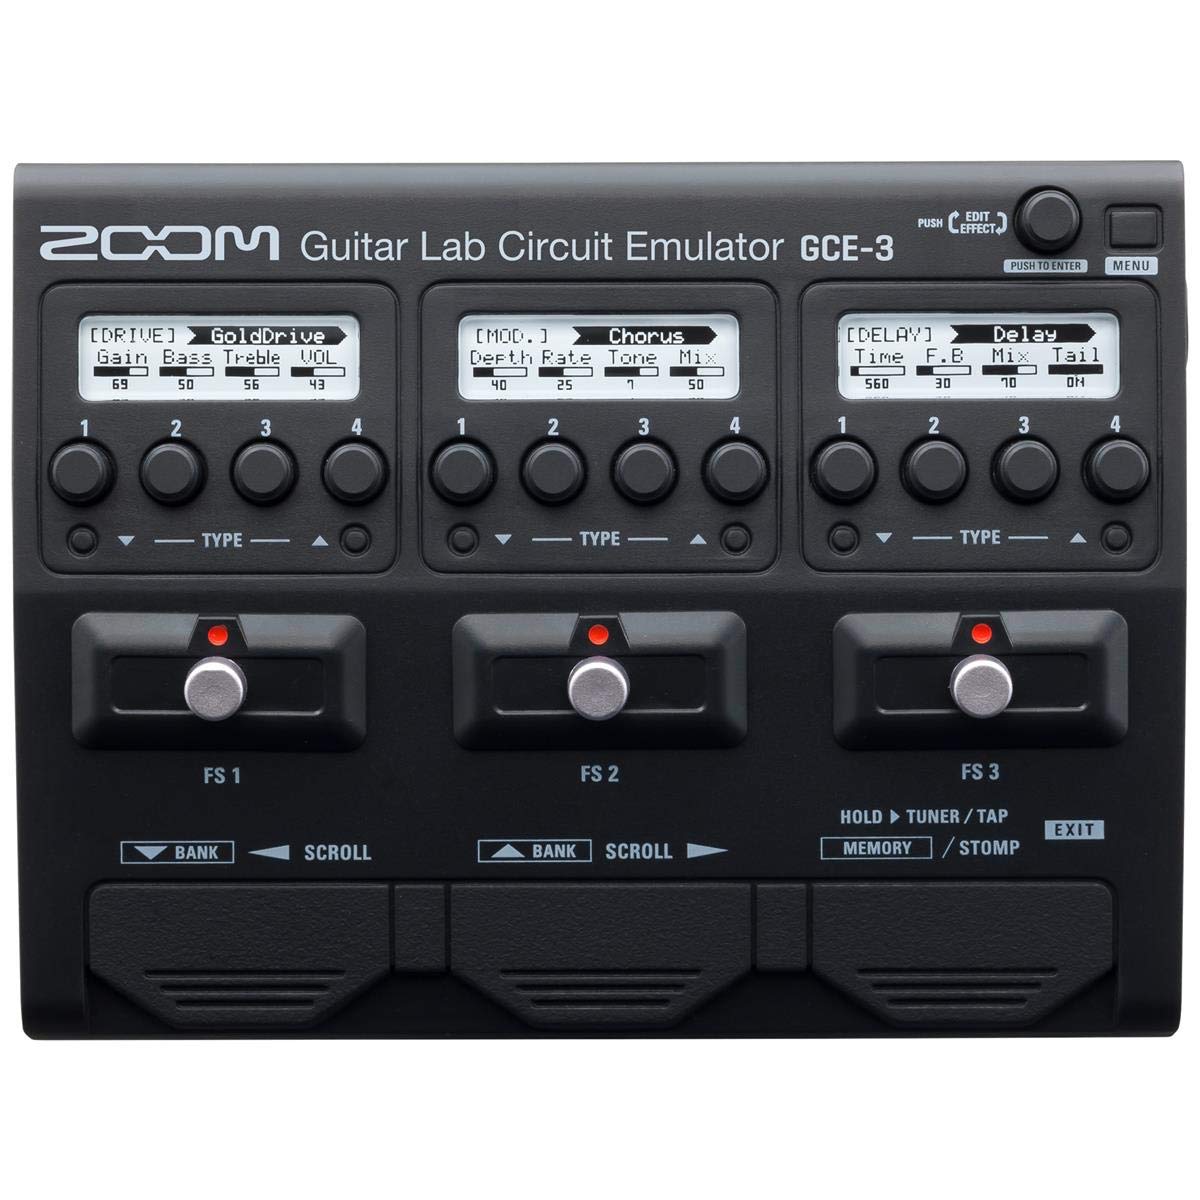


3. Opsette
3.1 Software Ynstallaasje
- Download the latest Zoom Guitar Lab software for your operating system (Mac or Windows) from the official Zoom website.
- Install the software by following the on-screen instructions. This typically includes installing necessary drivers for the GCE-3.
- Install the included Steinberg Cubase LE software if desired, using the provided license.
3.2 Hardware Ferbinings
- Ferbine mei kompjûter: Use the supplied USB-C cable to connect the GCE-3 to a USB port on your computer. The GCE-3 is bus-powered via USB-C, so no external power adapter is typically required.
- Ynstrumint ferbine: Plug your guitar or bass into the INPUT jack on the side of the GCE-3.
- Koptelefoan ferbine: For monitoring, plug your headphones into the PHONES jack. Adjust the volume using the dedicated VOLUME control.
- Connect External Audio (Optional): If you wish to play along with backing tracks, connect an external audio player (e.g., smartphone, MP3 player) to the AUX IN jack. The audio from the AUX IN will be routed to your headphones but will not be recorded by your computer.
3.3 Initial Power On
Once connected via USB, the GCE-3 will power on automatically. The power indicator LED will illuminate. Launch the Zoom Guitar Lab software on your computer. The software should detect the GCE-3 and begin loading its effects and patches.
Fideo 1: In oerview of the Zoom GCE-3 USB Audio Interface, demonstrating its compact size, connectivity, and integration with Guitar Lab software for accessing various effects and amp modellen.
4. Bedriuwsinstruksjes
4.1 Using Zoom Guitar Lab Software
The GCE-3 functions as a hardware interface for the Zoom Guitar Lab software. All effect selection, parameter editing, and patch management are performed within the software interface on your computer. The GCE-3's built-in DSP handles the audio processing, freeing up your computer's resources.
- Device Emulation: Within Guitar Lab, you can select to emulate various Zoom multi-effects processors such as the G5n, G3Xn, G3n, and B3n. This provides access to the specific amp models, artist effects, DSP algorithms, and patches associated with those units.
- Effekt seleksje: Browse through a wide array of effects including:
- Dynamics: Compressors, noise gates.
- Filter: Wah, equalizers.
- Ride: Distortion, overdrive, fuzz, boosters.
- Amp: Ferskate amplifier models (e.g., MS 800, FD TWNR, UK 30A).
- Kabinet: Speaker cabinet simulations (e.g., MS4x12, FD2x12).
- Modulaasje: Chorus, flanger, phaser, tremolo.
- SFX: Special effects.
- Fertraging: Various delay types.
- Reverb: Various reverb types.
- Patch bewurkje: Create, edit, and save custom patches by combining different effects, amps, and cabinets. Adjust parameters for each effect to fine-tune your sound.
- Opname: Connect the GCE-3 to your Digital Audio Workstation (DAW) software (e.g., Cubase LE, Ableton Live, Reaper). The GCE-3 will appear as an audio input device. You can record your guitar with the processed effects or record a dry signal and apply effects later within your DAW.
4.2 Monitoring
The GCE-3 provides direct monitoring through its headphone output. This allows you to hear your instrument with effects in real-time, without latency from your computer's audio processing. The dedicated VOLUME control adjusts the headphone output level.
5. Underhâld
To ensure the longevity and optimal performance of your Zoom GCE-3, follow these maintenance guidelines:
- Reiniging: Brûk in sêfte, droege doek om de bûtenkant fan it apparaat skjin te meitsjen. Brûk gjin abrasive reinigingsmiddels, oplosmiddels of waaks.
- Opslach: Bewarje it apparaat op in koel, droech plak, fuort fan direkt sinneljocht, ekstreme temperatueren en hege fochtigens.
- Behanneling: Avoid dropping the unit or subjecting it to strong impacts. Handle cables carefully to prevent damage to the ports.
- Software Updates: Regularly check the Zoom website for updates to the Guitar Lab software and GCE-3 firmware to ensure you have the latest features and bug fixes.
6. Probleemoplossing
If you encounter issues with your GCE-3, refer to the following common troubleshooting steps:
- Gjin macht: Ensure the USB-C cable is securely connected to both the GCE-3 and your computer. Try a different USB port or cable. Verify your computer's USB port is providing sufficient power.
- Not Recognized by Computer/Guitar Lab:
- Confirm that the Zoom GCE-3 drivers are correctly installed. Reinstall them if necessary.
- Restart your computer and the Guitar Lab software.
- Check your computer's device manager (Windows) or System Information (Mac) to see if the GCE-3 is listed as a connected audio device.
- Gjin lûd:
- Verify all cables (instrument, headphones, USB) are securely connected.
- Check the headphone VOLUME control on the GCE-3.
- Ensure the correct input/output device is selected in your DAW or computer's sound settings.
- Within Guitar Lab, confirm that effects are active and not bypassed, and output levels are set appropriately.
- Wachttiidproblemen: The GCE-3's DSP is designed for near-zero latency. If you experience noticeable latency, ensure you are monitoring directly through the GCE-3's headphone output and not through your computer's software monitoring. Adjust buffer sizes in your DAW settings if necessary.
- Software Glitches: If Guitar Lab behaves unexpectedly, try closing and reopening the application. Ensure your software and firmware are up to date.
For further assistance, please visit the official Zoom support website or consult the comprehensive online manual for the Zoom Guitar Lab software.
7. Spesifikaasjes
| Merk | Zoom |
| Model Number | GCE-3 |
| Kompatibele apparaten | Persoanlike kompjûter |
| Stipe Software | Zoom Guitar Lab |
| Konnektivität Technology | USB |
| Oantal kanalen | 3 |
| Bestjoeringssysteem | Windows, macOS |
| Audio Ynfier | USB |
| Maksimum Sample Rate | 44.1 kHz |
| Item Gewicht | 260g wy |
| UPC | 884354020361 |
8. Garânsje en stipe
8.1 Produktgarânsje
The Zoom GCE-3 comes with a 1-jier ferfangingsgarantie from the date of purchase. This warranty covers defects in materials and workmanship under normal use. For specific terms and conditions, please refer to the warranty information provided with your product or visit the official Zoom website.
8.2 Customer Support
For technical support, product registration, or further inquiries, please visit the official Zoom North America website:
You can also find FAQs, driver downloads, and additional resources on their support pages.