
1. Ynlieding
This manual provides detailed instructions for the installation, operation, and maintenance of your POPP THC15A Digital Programmable Weekly Timer Switch. This device is designed to automatically control the power supply to electrical appliances based on programmed schedules, offering convenience and energy efficiency. Please read this manual thoroughly before use to ensure proper function and safety.
2. Safety Information
Nim altyd de folgjende feilichheidsmaatregels yn acht om ferwûnings of skea oan it apparaat te foarkommen:
- Ynstallaasje moat allinich útfierd wurde troch in kwalifisearre elektricien.
- Soargje derfoar dat de stroomfoarsjenning is loskeppele foar ynstallaasje of ûnderhâld.
- Oerskriid de maksimale ladingsbeoardieling fan 16A / 3500W net.
- Bliuw it apparaat net oan focht of ekstreme temperatueren.
- Dit apparaat is allinich foar gebrûk binnen.
3. Produkt Overview
3.1 Features
- Advanced pre-setting one week before.
- Digital electronic timer switch with daily and weekly programs.
- Repeat programs with up to 17 ON/OFF settings.
- Manual override function.
- Lithium battery power reserve for memory backup during power outages.
- Ideal for household use on DB panels, rated for 3500W/16A.
- 24 hours / 7 days a week programmable.
- Automatic time error correction of +/- 30 seconds weekly.
3.2 komponinten
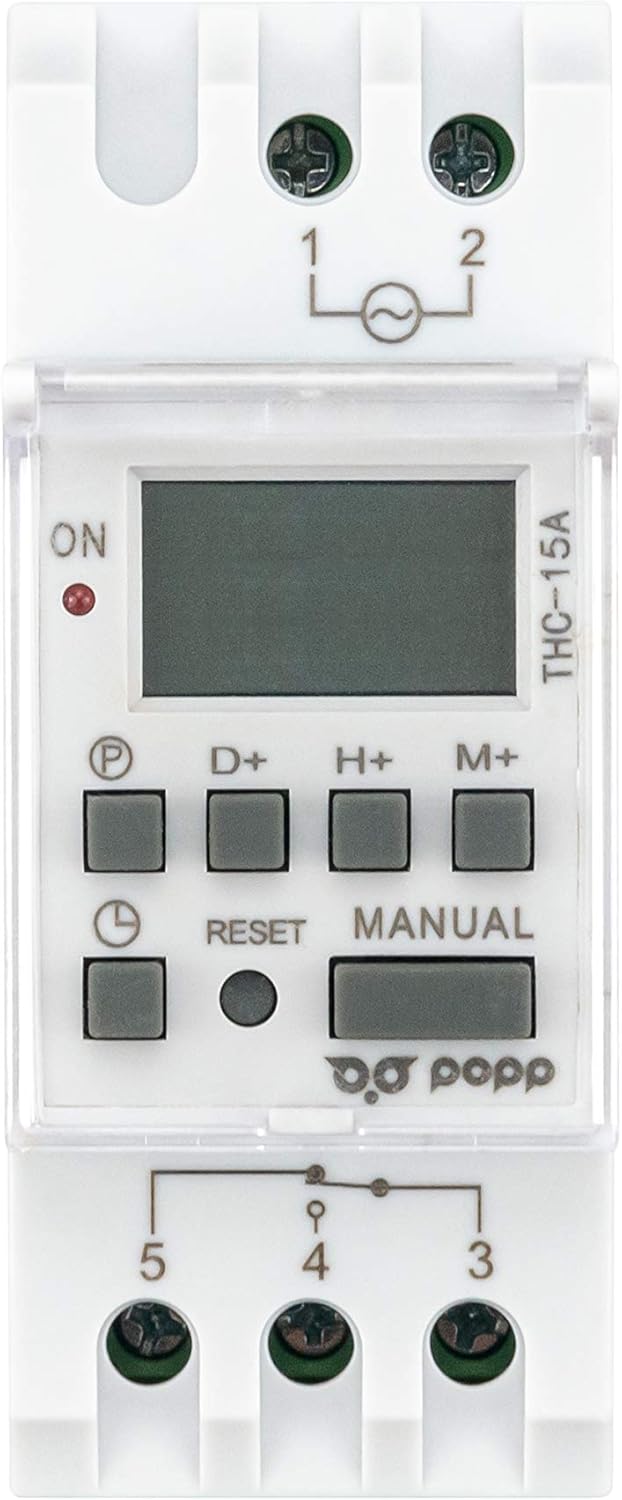
figuer 1: Front View of POPP THC15A Timer Switch. This image shows the front panel of the timer switch, featuring the LCD display, programming buttons (P, D+, H+, M+), Reset button, Manual button, and the ON indicator light.

Figuer 2: Hoekich View of POPP THC15A Timer Switch. This image provides an angled perspective of the timer, highlighting its compact design and the protective clear cover over the display and buttons.
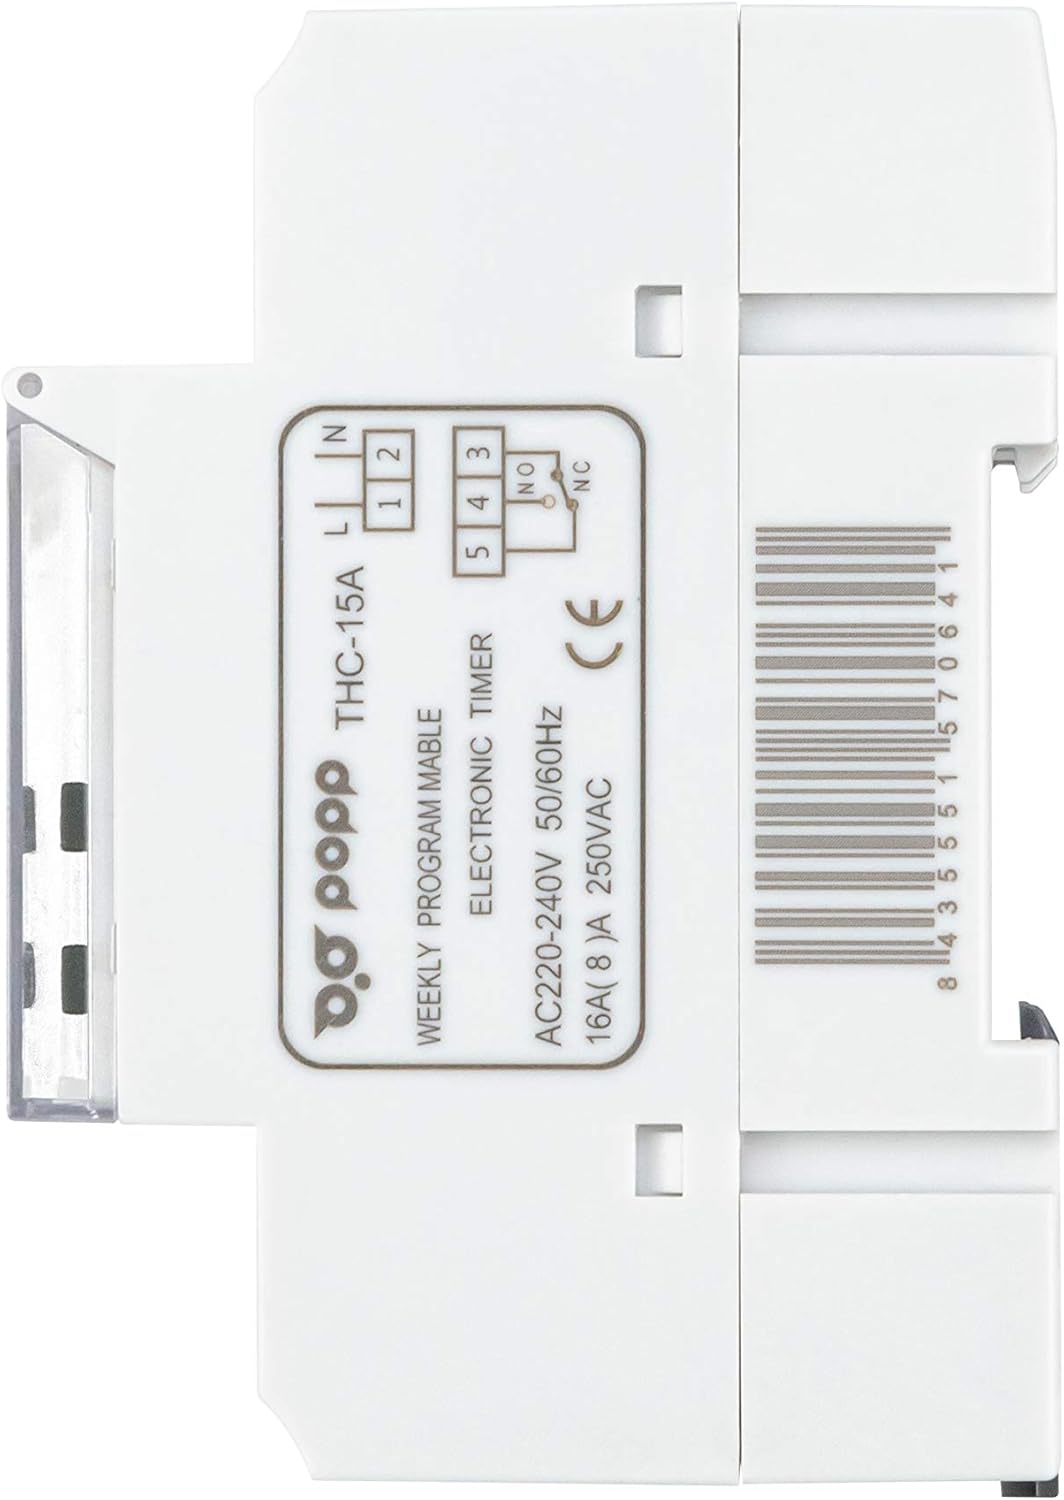
figuer 3: Side View of POPP THC15A Timer Switch. Dizze ôfbylding lit de sydpro sjenfile of the timer switch, showing its depth and DIN rail mounting clips.

figuer 4: Efterkant View with Wiring Diagram. This image shows the rear of the timer switch, including the terminal block for electrical connections and the printed wiring diagram for input (L, N) and output (NO, NC, COM).
4. Opsette
4.1 Ynstallaasje
The THC15A timer switch is designed for DIN rail mounting. Follow these steps for installation:
- Strom útskeakelje: Ensure the main power supply to the installation area is completely switched off before proceeding.
- Montage: Clip the timer switch onto a standard 35mm DIN rail within your electrical panel.
- Wiring: Refer to the wiring diagram on the back of the device (Figure 4) and the instructions below for correct connections.
- Power Input (220V AC): Connect the Live (L) wire to terminal 1 and the Neutral (N) wire to terminal 2.
- Laadútfier: Connect the Live wire from the load to terminal 4 (Common). Connect the Live wire to be switched to terminal 3 (Normally Open, NO) for standard operation (power ON when timer is active). If a Normally Closed (NC) connection is required, use terminal 5.
- Oerbrêging: For typical applications, a bridge wire is required between terminal 1 (Input Live) and terminal 4 (Output Common) if the load is to be powered by the same source as the timer.
- Feilige ferbiningen: Soargje derfoar dat alle triedferbiningen strak en feilich binne.
- Kracht werstelle: Once installation is complete and verified, restore the main power supply.
4.2 Initial Power-Up and Reset
Upon initial power-up or after a prolonged power outage, the display may be blank. The internal battery will charge, and the display should activate within a few minutes. If the display remains blank or shows erratic characters, perform a reset:
- Sykje de lytse RESETTE button on the front panel (usually recessed).
- Use a pointed non-metallic object (e.g., a pen tip) to press the RESETTE knop.
- The display will clear, and the timer will return to its default settings (00:00, Monday).
5. Bedriuwsinstruksjes
5.1 Ynstelle fan aktuele tiid en dei
Before programming, set the current time and day:
- Druk en hâld de KLOK button (often marked with a clock icon).
- Wylst hâlden KLOK, druk D+ to set the current day (MO, TU, WE, TH, FR, SA, SU).
- Wylst hâlden KLOK, druk H+ to set the current hour (0-23).
- Wylst hâlden KLOK, druk M+ to set the current minute (0-59).
- Release de KLOK knop. De tiid is no ynsteld.
5.2 Programmearjen fan OAN/ÚT-syklusen
The timer allows up to 17 ON/OFF programs. Follow these steps:
- Druk op de P button (Program). The display will show '1 ON'.
- Parse D+ to select the day(s) for this program. You can choose individual days, blocks of days (e.g., MO-FR, SA-SU), or all days (MO-SU).
- Parse H+ om it winske ON-oere yn te stellen.
- Parse M+ om de winske ON-minút yn te stellen.
- Parse P wer. It display sil '1 ÚT' sjen litte.
- Repeat steps 2-4 to set the OFF time for the first program.
- Parse P again to move to the next program ('2 ON'). Repeat the process for all desired programs (up to 17 ON/OFF pairs).
- Om de programmearring modus te ferlitten, druk op de KLOK button. The timer will return to displaying the current time.
5.3 Hânlieding oerskriuwe
De HANTLIEDING button allows you to temporarily override the programmed settings:
- Parse HANTLIEDING werhelle kearen om troch modi te blêdzjen:
- AUTO ON: The output is currently ON, but will follow the next programmed OFF event.
- AUTO OFF: The output is currently OFF, but will follow the next programmed ON event.
- OP: The output is forced ON, ignoring all programs.
- ÚT: The output is forced OFF, ignoring all programs.
- To return to automatic operation, cycle through the modes until 'AUTO ON' or 'AUTO OFF' is displayed, depending on the current programmed state.
6. Underhâld
The POPP THC15A Digital Programmable Weekly Timer Switch requires minimal maintenance. Keep the device clean and free from dust. Do not use abrasive cleaners or solvents. Ensure the ventilation slots (if any) are not obstructed. The internal battery is designed for long-term use and is not user-replaceable.
7. Probleemoplossing
If you encounter issues with your timer switch, refer to the table below:
| Probleem | Mooglike oarsaak | Oplossing |
|---|---|---|
| Display is leech. | No power supply; internal battery discharged. | Check power connections. Allow time for internal battery to charge (up to 15 minutes). If still blank, perform a reset. |
| Timer not switching load ON/OFF. | Incorrect wiring; program error; manual override active; load exceeds capacity. | Verify wiring according to Figure 4. Check programmed ON/OFF times. Ensure timer is in 'AUTO' mode. Confirm load does not exceed 16A/3500W. |
| De tiid is ûnkrekt. | Initial setting error; significant power fluctuations. | Reset and re-set the current time and day. The device has automatic error correction of +/- 30 seconds weekly. |
| Cannot enter programming mode. | Buttons unresponsive; device malfunction. | Perform a reset. If the issue persists, contact customer support. |
8. Spesifikaasjes
| Merk | Popp |
| Model Number | THC15A |
| Kleur | Wyt |
| Produkt Ofmjittings (L x B x H) | 6.5 x 3.6 x 8.6 sm (65P x 36l x 86H millimeters) |
| Materiaal | Plestik |
| Item Gewicht | 140g wy |
| Fabrikant | POPP |
| Oantal ynstellings | Oant 17 oan/út programma's |
| Ynternasjonale artikelkoade (UPC) | 08435551570641 |
| Skermgrutte | 2 ynms |
| Voltage | 220-240V AC |
| Aktuele wurdearring | 16A |
| Frekwinsje | 50/60 Hz |
9. Garânsje en stipe
Specific warranty information for the POPP THC15A Digital Programmable Weekly Timer Switch is not provided in this document. For warranty details, technical support, or service inquiries, please refer to the product packaging or contact the manufacturer directly. Keep your purchase receipt as proof of purchase.