
1. Ynlieding
This manual provides detailed instructions for the installation, operation, and maintenance of the SINOTIMER TM919A-2 LCD Digital Programmable Timer Switch. This device is designed for automatic control of electrical appliances based on programmed time schedules, offering daily and weekly programming options.
2. Produktfunksjes
- Weekly 7-day programmable digital time switch.
- Meardere voltage options (5V, 12V, 24V, 110V, 220V, 85-265V). This specific model is 220V.
- Detachable battery design for backup power.
- 35mm DIN rail mounting for easy installation.
- LCD display for clear time and program viewing.
- 16 ON/OFF programs per day or week.
- Manual override function.
- High capacity 16A switching contact.
3. Safety Information
WARNING: Risk of electric shock. Installation should only be performed by a qualified electrician or competent person.
- Soargje derfoar dat de stroom is loskeppele foar ynstallaasje of ûnderhâld.
- Do not exceed the maximum load capacity of 16A.
- Kontrolearje de krekte voltage supply for the specific model (220V for TM919A-2).
- Hâld it apparaat fuort fan focht en ekstreme temperatueren.
4. Produkt Overview en komponinten
The SINOTIMER TM919A-2 features an LCD display, control buttons, and wiring terminals for power input and load control.

Ofbylding 4.1: Front view of the SINOTIMER TM919A-2 Digital Timer Switch, showing the LCD display, control buttons (P, D+, H+, M+, RESET, MANUAL), and wiring terminals.

Ofbylding 4.2: The timer switch with its transparent protective cover opened, revealing the control buttons for programming and manual operation.
Kontrôle knoppen:
- P (Programma): Giet de programma-ynstellingsmodus yn.
- D+ (Day): Adjusts day of the week or program day.
- H+ (Hour): Adjusts hour or program hour.
- M+ (Minute): Adjusts minute or program minute.
- RESETTE: Alle ynstellingen weromsette op fabrykswearden.
- HANTLIEDING: Toggles output ON/AUTO/OFF.
5. Opset en ynstallaasje
5.1 Wiring Diagram
Refer to the wiring diagram on the side of the device and the illustration below for correct connection. Ensure all connections are secure.

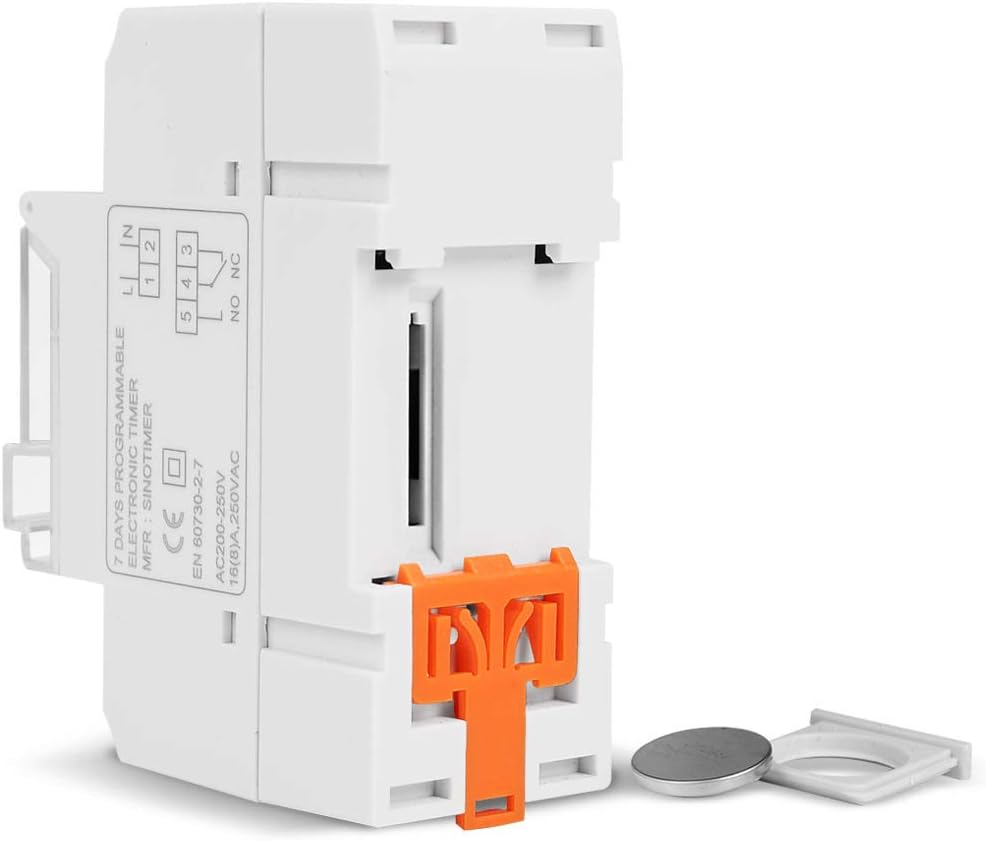
Ofbylding 5.1: Side view of the timer switch displaying the wiring diagram. Terminals 1 and 2 are for power input (L and N). Terminals 3, 4, and 5 are for the relay output (Common, Normally Open, Normally Closed).
- Terminals 1 & 2 (L, N): Connect to the main power supply (220V AC for this model).
- Terminal 3 (NO - Normally Open): Connects to the load when the timer is ON.
- Terminal 4 (COM - Common): Connects to one side of the load and the power supply.
- Terminal 5 (NC - Normally Closed): Connects to the load when the timer is OFF (less common for typical applications).
5.2 Earste ynskeakeljen en weromsette
Upon first power-up or after a long period without power, the LCD display may be blank. The internal battery provides backup for settings. If the display is unresponsive or shows garbled characters, press the RESETTE button using a pointed object (e.g., a pen tip). This will clear all settings and restore the timer to its default state.
5.3 Ynstelle fan aktuele tiid en dei
- Druk op de P knop ien kear. It display sil de aktuele tiidynstelling sjen litte.
- Parse D+ om de aktuele dei fan 'e wike yn te stellen.
- Parse H+ om it hjoeddeistige oere yn te stellen.
- Parse M+ om de aktuele minút yn te stellen.
- Druk op de P button again to exit time setting mode and return to normal operation.
6. Bedriuwsinstruksjes
6.1 Programmearjen fan OAN/ÚT-syklusen
De timer stipet maksimaal 16 OAN/ÚT-programma's. Elk programma bestiet út in OAN-tiid en in ÚT-tiid.
- Druk op de P button repeatedly until "1 ON" appears on the display. This is the first ON program.
- Parse D+ om de dei(en) foar dit programma te selektearjen. Opsjes omfetsje yndividuele dagen, wurkdagen, wykeinen of alle 7 dagen.
- Parse H+ to set the desired hour for the "ON" event.
- Parse M+ to set the desired minute for the "ON" event.
- Parse P again. "1 OFF" will appear. This is the first OFF program.
- Repeat steps 2-4 to set the day(s), hour, and minute for the "OFF" event.
- Trochgean te drukken P to cycle through "2 ON", "2 OFF", up to "16 ON", "16 OFF". If you do not need all 16 programs, simply press P until the display returns to the current time.
- To save and exit programming mode, press the P button until the current time is displayed.
6.2 Hânlieding oerskriuwe
De HANTLIEDING button allows you to override the programmed settings temporarily or permanently.
- Parse HANTLIEDING once: Toggles between ON/AUTO/OFF modes.
- OP: The output is continuously ON, ignoring programs.
- ÚT: The output is continuously OFF, ignoring programs.
- AUTO: The timer operates according to the programmed ON/OFF cycles. This is the standard operating mode.
7. Underhâld
7.1 Batterijferfanging
The timer includes a detachable CR2032 lithium battery to maintain time and program settings during power outages. If the display becomes dim or resets frequently, the battery may need replacement.

Ofbylding 7.1: The timer switch shown with its battery compartment open and a CR2032 lithium battery, indicating the detachable battery design.
- Disconnect power to the timer before attempting battery replacement.
- Locate the battery compartment, typically on the side or back of the unit.
- Ferwiderje foarsichtich de âlde CR2032-batterij.
- Doch in nije CR2032-batterij yn, en soargje derfoar dat de polariteit goed is (+ kant nei boppen).
- Slút de batterij compartment.
- Reconnect power and reset the current time and day if necessary.
8. Probleemoplossing
- Display is leech:
- Check power supply connections (Terminals 1 & 2).
- Ensure the internal battery is charged or replaced if old.
- Druk op de RESETTE knop.
- Programma's rinne net:
- Soargje derfoar dat de timer yn stiet AUTO mode (check the display for "AUTO"). Press HANTLIEDING te fytsmodi.
- Kontrolearje oft de hjoeddeiske tiid en dei goed ynsteld binne.
- Kontrolearje oft de OAN/ÚT-programma's korrekt ynfierd en ynskeakele binne foar de winske dagen.
- Confirm wiring to the load (Terminals 3, 4, 5) is correct.
- Timer resets unexpectedly:
- The internal battery may be low or depleted. Replace the CR2032 battery.
- Soargje foar in stabile stroomfoarsjenning nei it apparaat.
9. Spesifikaasjes
| Eigenskip | Spesifikaasje |
|---|---|
| Model | TM919A-2 |
| Streamtafier | 220V AC (as per model) |
| Stromferbrûk | 4.5 VA (MAX) |
| Temperatuerberik | -20 °C oant +50 °C |
| Skerm | LCD |
| Kontakt wikselje | 1 switch switch |
| Programma's | 16 ON/OFF per day or week |
| Hysteresis | 2 sec/day (at 25°C) |
| Kapasiteit | 16A |
| Timer Range | 1 minút oant 168 oeren |
| Minimum ynterval | 1 minút |
| Black-out Memory | 60 days (with internal battery) |
| Item Gewicht | 0.15 kg (5.3 ounces) |
| Montage | 35mm DIN-spoar |
| Skermgrutte | 1.2 ynms |
Ofbylding 9.1: Dimensional drawing of the SINOTIMER TM919A-2, showing measurements in centimeters for height, width, and depth.
10. Garânsje en stipe
Specific warranty information for the SINOTIMER TM919A-2 is not provided in the product details. For warranty claims or technical support, please contact your retailer or the manufacturer directly. Keep your purchase receipt as proof of purchase.