Ynlieding
This manual provides detailed instructions for the setup, operation, maintenance, and troubleshooting of your RCYAGO 5-in-1 Water Quality Tester. This device is designed for continuous monitoring of pH, Electrical Conductivity (EC), Conductivity Factor (CF), Total Dissolved Solids (TDS), and Temperature in various water applications. Please read this manual thoroughly before use to ensure accurate measurements and optimal performance.
Produkt oerview en komponinten
The RCYAGO 5-in-1 Water Quality Tester is a multi-parameter device featuring a main display unit and external probes. Understanding each component is essential for proper use.

Ofbylding beskriuwing: This diagram illustrates the main components of the RCYAGO 5-in-1 Water Quality Tester. It shows the main display unit with three digital screens for pH, Temperature, and EC/CF/PPM. Labeled parts include the Power Adapter input, ON/OFF Switch, PH electrode, EC/CF/TDS electrode, PH7 calibrate adjustment knob, °C/°F Action function switch, PH electrode input terminal, and EC/CF/TDS/Temp probe input terminal. The two external probes (pH and EC/CF/TDS/Temp) are shown connected to the main unit.
- Haadwerjefte-ienheid: Features three backlit LCD screens for simultaneous display of pH, Temperature, and EC/CF/TDS readings. Includes control buttons for mode selection and calibration.
- PH Electrode: Measures the acidity or alkalinity of the water.
- EC/CF/TDS/Temperature Probe: Measures electrical conductivity, conductivity factor, total dissolved solids, and temperature.
- Stromadapter: Provides continuous power to the unit.
- Calibration Solutions: Included for accurate calibration of pH and EC/CF/TDS.
Setup Ynstruksjes
Follow these steps for initial setup of your water quality tester.
1. Probe Ynstallaasje

Ofbylding beskriuwing: This image displays a four-step visual guide for installing the probes. Step 1 shows the main unit. Step 2 shows connecting the pH electrode to its BNC connector. Step 3 shows connecting the EC/CF/TDS/Temp probe to its input terminal. Step 4 shows both probes fully connected to the main unit, ready for use.
- Unpack all components: main unit, pH electrode, EC/CF/TDS/Temperature probe, and power adapter.
- Connect the pH electrode to the BNC connector on the main unit. Ensure a secure connection.
- Connect the EC/CF/TDS/Temperature probe to its designated input terminal on the main unit.
- Plug the power adapter into the main unit and then into a standard electrical outlet.
- Skeakelje it apparaat oan mei de ON/OFF-skeakel.
2. Initial Tarieding
- Before first use, remove the protective caps from both electrodes.
- Rinse the electrodes with distilled or deionized water.
- Ensure the electrodes are clean and free from any residue.
Operating Instructions
This section details how to take measurements and switch between different display modes.
1. Taken mjittingen
- Ensure the device is powered on and probes are connected.
- Immerse both the pH electrode and the EC/CF/TDS/Temperature probe into the water sample you wish to test. Ensure the electrodes are fully submerged but do not immerse the entire probe body or cable connections.
- Allow a few moments for the readings to stabilize on the display screens.
- Read the pH, Temperature, and EC/CF/TDS values directly from the respective LCD screens.
2. Switching EC/CF/TDS Modes
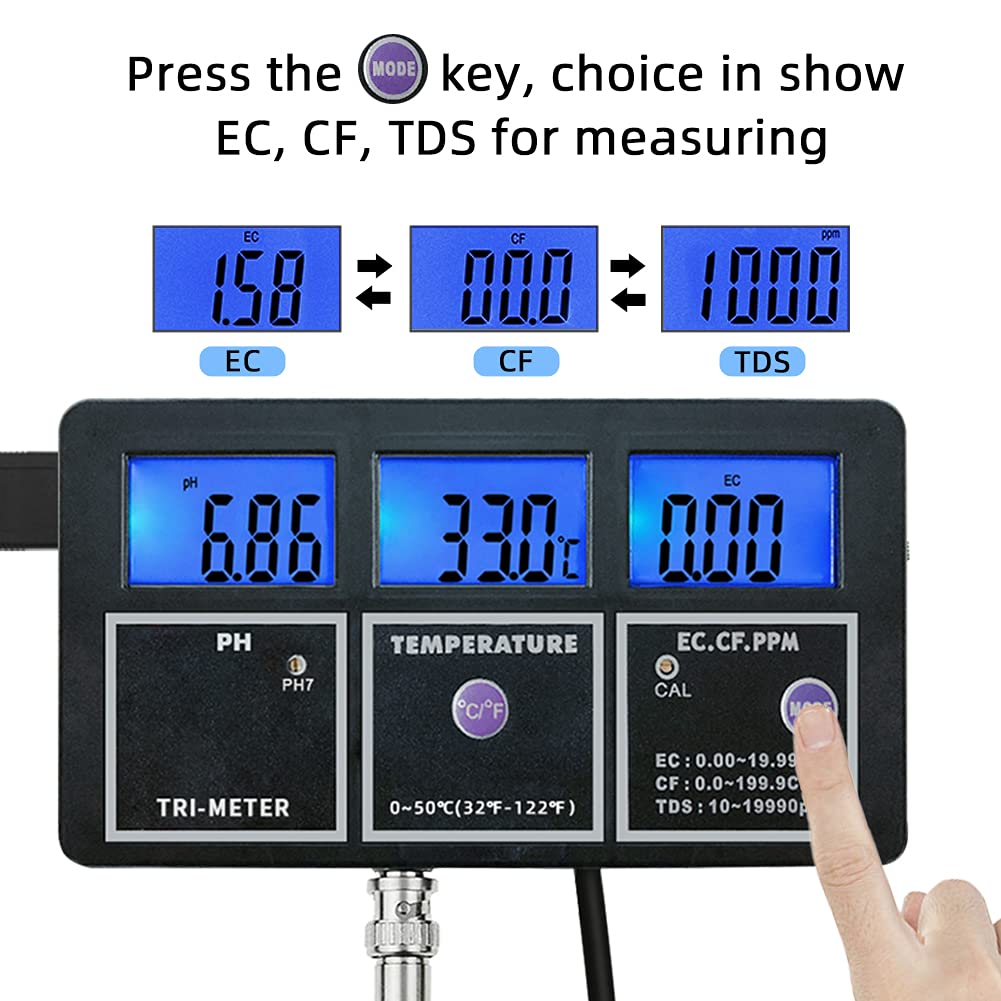
Ofbylding beskriuwing: This image illustrates the process of switching between EC, CF, and TDS measurement modes. It shows the main unit with a finger pressing the 'MODE' key. The display cycles through EC (e.g., 1.58), CF (e.g., 0.00), and TDS (e.g., 1000) readings, indicating that pressing the 'MODE' button changes the displayed parameter in the rightmost screen.
- Druk op de WIZE key located on the right side of the main unit.
- Each press will cycle the rightmost display between EC (Electrical Conductivity), CF (Conductivity Factor), and TDS (Total Dissolved Solids) readings.
3. Temperatuerienheden wikselje (°C/°F)

Ofbylding beskriuwing: This image demonstrates how to change the temperature unit. It shows the main unit with a finger pressing the '°C/°F' key. The temperature display changes from Celsius (e.g., 30.6°C) to Fahrenheit (e.g., 83.0°F), indicating the unit conversion.
- Druk op de ° C / ° F. key located below the temperature display.
- Each press will toggle the temperature display between Celsius (°C) and Fahrenheit (°F).
Kalibraasje
Regular calibration ensures the accuracy of your water quality tester. It is recommended to calibrate the device upon first use and periodically thereafter, or if readings appear inconsistent.
1. pH Kalibraasje
The pH meter typically requires a two-point or three-point calibration using standard buffer solutions (e.g., pH 6.86, pH 4.01, pH 9.18).
- Prepare the pH buffer solutions (e.g., pH 6.86 and pH 4.01 or pH 9.18).
- Rinse the pH electrode with distilled water and blot dry.
- Immerse the pH electrode into the pH 6.86 buffer solution.
- Locate the pH7 calibrate adjustment knob on the main unit. Use a small screwdriver to carefully turn the knob until the pH display reads 6.86.
- Rinse the electrode again with distilled water.
- Immerse the pH electrode into the second buffer solution (e.g., pH 4.01).
- Adjust the pH4.01/pH9.18 calibration screw (if available, or follow specific instructions for your model's second point calibration) until the display matches the buffer solution value. Note: Some models may have a single pH calibration knob for pH7 and then rely on internal circuitry for the second point. Refer to specific product documentation if available.
- Rinse the electrode and it is now calibrated.
2. EC/CF/TDS Calibration
EC/CF/TDS calibration typically uses a standard conductivity solution (e.g., 1413 µS/cm).
- Prepare a standard EC calibration solution (e.g., 1413 µS/cm).
- Rinse the EC/CF/TDS/Temperature probe with distilled water and blot dry.
- Immerse the EC/CF/TDS/Temperature probe into the calibration solution.
- Druk op de CAL button (if present) or locate the EC/CF/TDS calibration adjustment screw.
- Adjust the calibration screw until the display matches the value of the calibration solution.
- Rinse the probe and it is now calibrated.
Belangryk: Always use fresh calibration solutions. Do not reuse solutions as their values can change over time due to contamination or evaporation.
Ûnderhâld
Proper maintenance extends the life and accuracy of your water quality tester.
- Elektroderreiniging: After each use, rinse both electrodes thoroughly with distilled or deionized water to prevent contamination and buildup.
- Opslach: Always replace the protective caps on the electrodes when not in use. The pH electrode cap should contain a small amount of storage solution (or pH 4 buffer) to keep the glass bulb hydrated. Do not store pH electrodes dry.
- Sonde soarch: Handle probes gently. Avoid dropping or subjecting them to physical shock.
- Haad ienheid: Keep the main unit clean and dry. Avoid exposure to direct sunlight, extreme temperatures, or corrosive environments.
- Krêft: Disconnect the power adapter when the device is not in continuous use for extended periods.
Troubleshooting
As jo problemen hawwe mei jo apparaat, sjoch dan nei de folgjende faak foarkommende problemen en oplossingen.
| Probleem | Mooglike oarsaak | Oplossing |
|---|---|---|
| No display/Device not turning on | No power, faulty adapter, loose connection. | Check power adapter connection. Ensure outlet is functional. Try a different power source if available. |
| Unkrekte pH-lêzingen | Electrode not calibrated, dirty electrode, electrode dry, expired buffer solution. | Calibrate pH electrode. Clean electrode with distilled water. Ensure pH electrode is stored in solution. Use fresh buffer solutions. |
| Inaccurate EC/CF/TDS readings | Probe not calibrated, dirty probe, air bubbles on probe. | Calibrate EC/CF/TDS probe. Clean probe. Gently shake probe to dislodge air bubbles. |
| Slow reaksje tiid | Dirty electrodes, aged electrodes. | Clean electrodes thoroughly. If problem persists, electrodes may need replacement. |
| Fluktuearjende lêzingen | Ynstabyl sample temperature, air bubbles, electrical interference. | Soargje sample temperature is stable. Remove air bubbles. Move device away from strong electrical fields. |
Spesifikaasjes
Technical specifications for the RCYAGO 5-in-1 Water Quality Tester.
- Produkt Ofmjittings: 5.98 x 3.15 x 0.79 inch
- Item Gewicht: 1.51 pûn sterling
- Fabrikant: RCYAGO
- Model Oantal: PH Meter
- ASIN: B09B9FXCSG
- Metingsparameters: pH, EC, CF, TDS (PPM), Temperature
- Temperatuerberik: 0-50°C (32-122°F)
- Skerm: Backlit LCD
- Power Boarne: AC/DC Power Adapter (included)
Applikaasje Areas
The RCYAGO 5-in-1 Water Quality Tester is suitable for a wide range of applications requiring water quality monitoring.
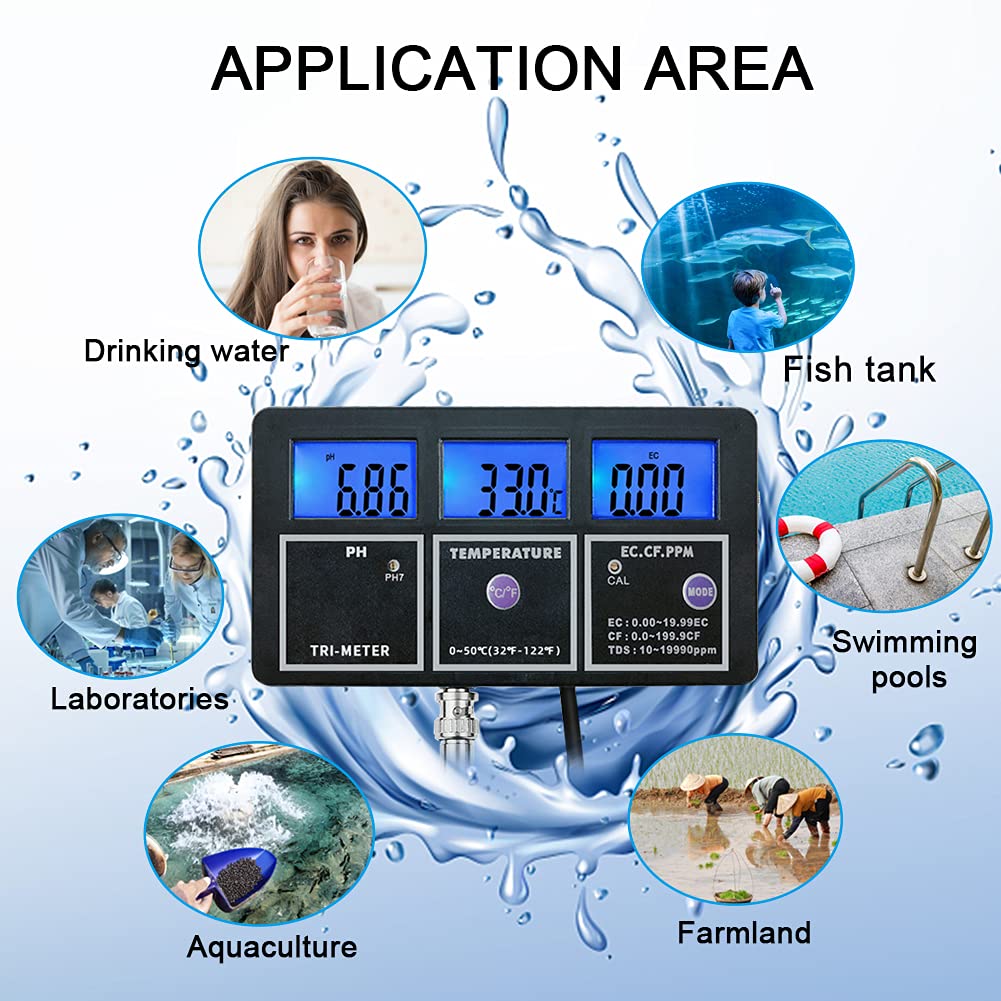
Ofbylding beskriuwing: This image displays the various application areas for the water quality tester. It shows the main unit surrounded by six circular icons depicting different uses: Drinking water, Fish tank, Swimming pools, Farmland, Aquaculture, and Laboratories. This illustrates the versatility of the device for diverse water monitoring needs.
- Testen fan drinkwetterkwaliteit
- Akwariums en fisktanks
- Swimbaden en spa's
- Hydroponics and Aquaculture
- Laboratories and Educational Settings
- Agricultural and Environmental Monitoring
Garânsje en stipe
For warranty information and technical support, please refer to the official RCYAGO webside of nim direkt kontakt op mei harren klanttsjinst. Bewarje jo oankeapbewiis foar garânsjeclaims.
RCYAGO Official Website: www.rcyago.com