1. Ynlieding
Thank you for choosing the Karaca BakeXL Bread Maker. This versatile appliance is designed to simplify your baking experience, allowing you to prepare fresh bread, knead dough, make jam, and even yogurt with ease. Your bread maker also comes with a booklet containing 45 different recipes to get you started. Please read this manual thoroughly before first use to ensure safe operation and optimal performance. Keep this manual for future reference.
2. Wichtige Safety Ynstruksjes
- Soargje der altyd foar dat it apparaat út it stopkontakt helle is foardat jo it skjinmeitsje of as it net yn gebrûk is.
- Dompel it apparaat, snoer of plug net yn wetter of in oare floeistof.
- Hâld hannen en gebrûksfoarwerpen fuort fan bewegende ûnderdielen tidens operaasje om ferwûnings te foarkommen.
- Do not touch hot surfaces. Use oven mitts when removing the bread pan or handling hot bread.
- Dit apparaat is allinich foar húshâldlik gebrûk. Net brûke bûten.
- Soargje derfoar dat it apparaat op in stabyl, waarmtebestindich oerflak pleatst wurdt, fuort fan brânbere materialen.
- Nauwe tafersjoch is nedich as elk apparaat wurdt brûkt troch of tichtby bern.
- Betsjinje gjin apparaat mei in skansearre snoer of stekker, of neidat it apparaat defekt is of op ien of oare manier skansearre is.
- Brûk gjin accessoires dy't net oanrikkemandearre binne troch de fabrikant, om't dit ferwûnings feroarsaakje kin.
3. Produkt Overview
Familiarize yourself with the components of your Karaca BakeXL Bread Maker:

Ofbylding 3.1: Eksterieur view of the Karaca BakeXL Bread Maker. This image shows the sleek black and silver design of the appliance from an angled perspective, highlighting its compact form.

Ofbylding 3.2: Bread Maker with lid open. This view reveals the interior cavity where the bread pan is placed, along with the heating element and the mechanism for the kneading paddles.

Ofbylding 3.3: Bread Maker with the bread pan removed. This image displays the main unit alongside the removable bread pan, illustrating how it detaches for easy cleaning and ingredient loading.
Funksjes fan kontrôlepaniel:

Ofbylding 3.4: Close-up of the control panel. This image provides a clear view of the digital display and various buttons for program selection, loaf size, crust color, and start/stop functions.
- MENU: Selects the desired program (e.g., Basic Bread, Whole Wheat, Jam, Yogurt).
- LOAF SIZE: Adjusts the loaf weight (e.g., 1000g, 1250g, 1500g).
- KLEUR: Sets the crust darkness (Light, Medium, Dark).
- DELAY TIMER (+/-): Sets a delayed start time for baking.
- START / STOP: Initiates or cancels the selected program.
4. Ynstelling en earste gebrûk
- Unpack the bread maker and all accessories. Remove any packaging materials.
- Wipe de bûtenkant fan it apparaat mei adamp doek.
- Wash the bread pan and kneading paddles with warm, soapy water. Rinse thoroughly and dry completely.
- Insert the kneading paddles onto the shafts at the bottom of the bread pan.
- Place the bread pan into the baking chamber, ensuring it clicks securely into place.
- Position the bread maker on a stable, flat, and heat-resistant surface, ensuring adequate ventilation around the unit.
- For the first use, it is recommended to run the "Bake" program (usually program 12 or similar) for 10 minutes without ingredients to burn off any manufacturing residues. Allow the unit to cool completely afterward.
5. Bedriuwsinstruksjes
General Baking Steps:
- Ensure the kneading paddles are correctly installed in the bread pan.
- Add liquid ingredients first, followed by dry ingredients. Make sure yeast is added last and does not come into direct contact with liquid or salt. Refer to your recipe booklet for precise ingredient order.
- Place the bread pan into the bread maker and close the lid.
- Plug in the appliance. The default program will display.
- Druk op de MENU button to select your desired program.
- Druk op de LOAF SIZE button to select the desired loaf weight (e.g., 1000g, 1250g, 1500g).
- Druk op de KLEUR button to select your preferred crust darkness (Light, Medium, Dark).
- If desired, use the DEAY TIMER buttons to set a delayed start.
- Druk op de START/STOPP button to begin the program. The machine will beep, and the timer will start counting down.
- Once the program is complete, the machine will beep multiple times. Unplug the appliance.
- Using oven mitts, carefully remove the bread pan by twisting and lifting it out.
- Invert the pan onto a wire rack to release the bread. If the kneading paddles remain in the bread, remove them carefully with a non-metallic utensil.
- Lit it brea op syn minst 20-30 minuten ôfkuolje op in rekje foardat jo it yn plakjes snije.

Ofbylding 5.1: A user selecting settings on the control panel. This image shows a hand pressing one of the control buttons, demonstrating the interactive nature of the bread maker's interface.
Specific Program Notes:
- Bread Programs (Basic, French, Whole Wheat, Sweet, Rapid): These programs handle the entire process from kneading to baking. Follow the recipe booklet for specific ingredient ratios.
- Dough Program: This program kneads and allows the dough to rise, but does not bake it. Ideal for pizza dough, rolls, or pastries that will be baked in a conventional oven.
- Jam Program: Use this program for making homemade jams. Ensure fruits are chopped and sugar is added according to a suitable recipe.
- Yogurt Program: This program maintains a consistent temperature for fermenting yogurt. Follow specific yogurt recipes for best results.
6. Underhâld en Cleaning
Regular cleaning ensures the longevity and hygiene of your bread maker.
- Skeakelje it apparaat altyd út en lit it folslein koelje foardat jo skjinmeitsje.
- Bôlepanne en kneedpaddels: Remove the bread pan and paddles. Wash them with warm, soapy water using a soft sponge. Do not use abrasive cleaners or metal scouring pads, as this can damage the non-stick coating. Rinse and dry thoroughly.
- Eksterieur: Feie de bûtenkant fan 'e bôlebakmasine ôf mei in sêfte, damp doek. Brûk gjin hurde gemikaliën of abrasive skjinmakkers.
- Lid: It deksel kin skjinmakke wurde mei advertinsjeamp cloth. Ensure no water enters the ventilation slots.
- Bakkerij: Brûk in sêft, damp cloth to wipe the inside of the baking chamber. Remove any crumbs or residue.
- Dompelje de haadunit nea yn wetter of in oare floeistof.
7. Probleemoplossing
| Probleem | Mooglike oarsaak | Oplossing |
|---|---|---|
| Bôle komt net omheech. | Expired yeast, incorrect water temperature, too much salt/sugar, yeast in direct contact with liquid/salt. | Check yeast expiry. Use lukewarm water (38-43°C). Ensure ingredients are added in the correct order as per recipe. |
| It brea is te ticht. | Tefolle moal, te min floeistof, net genôch kneden. | Measure ingredients precisely. Ensure correct program is selected. |
| It brea falt yn 'e midden yninoar. | Tefolle floeistof, tefolle gist, hege fochtigens. | Reduce liquid slightly. Ensure correct yeast amount. |
| Kneading paddles stuck in bread. | Faak foarkommend. | Remove carefully with a non-metallic utensil after bread has cooled. |
| Masine begjint net. | Not plugged in, lid not closed properly, program not selected. | Check power connection. Ensure lid is fully closed. Select a program and press START/STOP. |
8. Spesifikaasjes
- Merk: ROE
- Model Oantal: 000001000018219001
- Kleur: Swart
- Produkt Ofmjittings: 30 sm (Djipte) x 36 sm (Breedte) x 46 sm (Hichte)
- Gewicht: 7.22 kilogram
- Kapasiteit: 1500 gram
- Power/Wattage: 850 watt
- Materiaal: Plestik
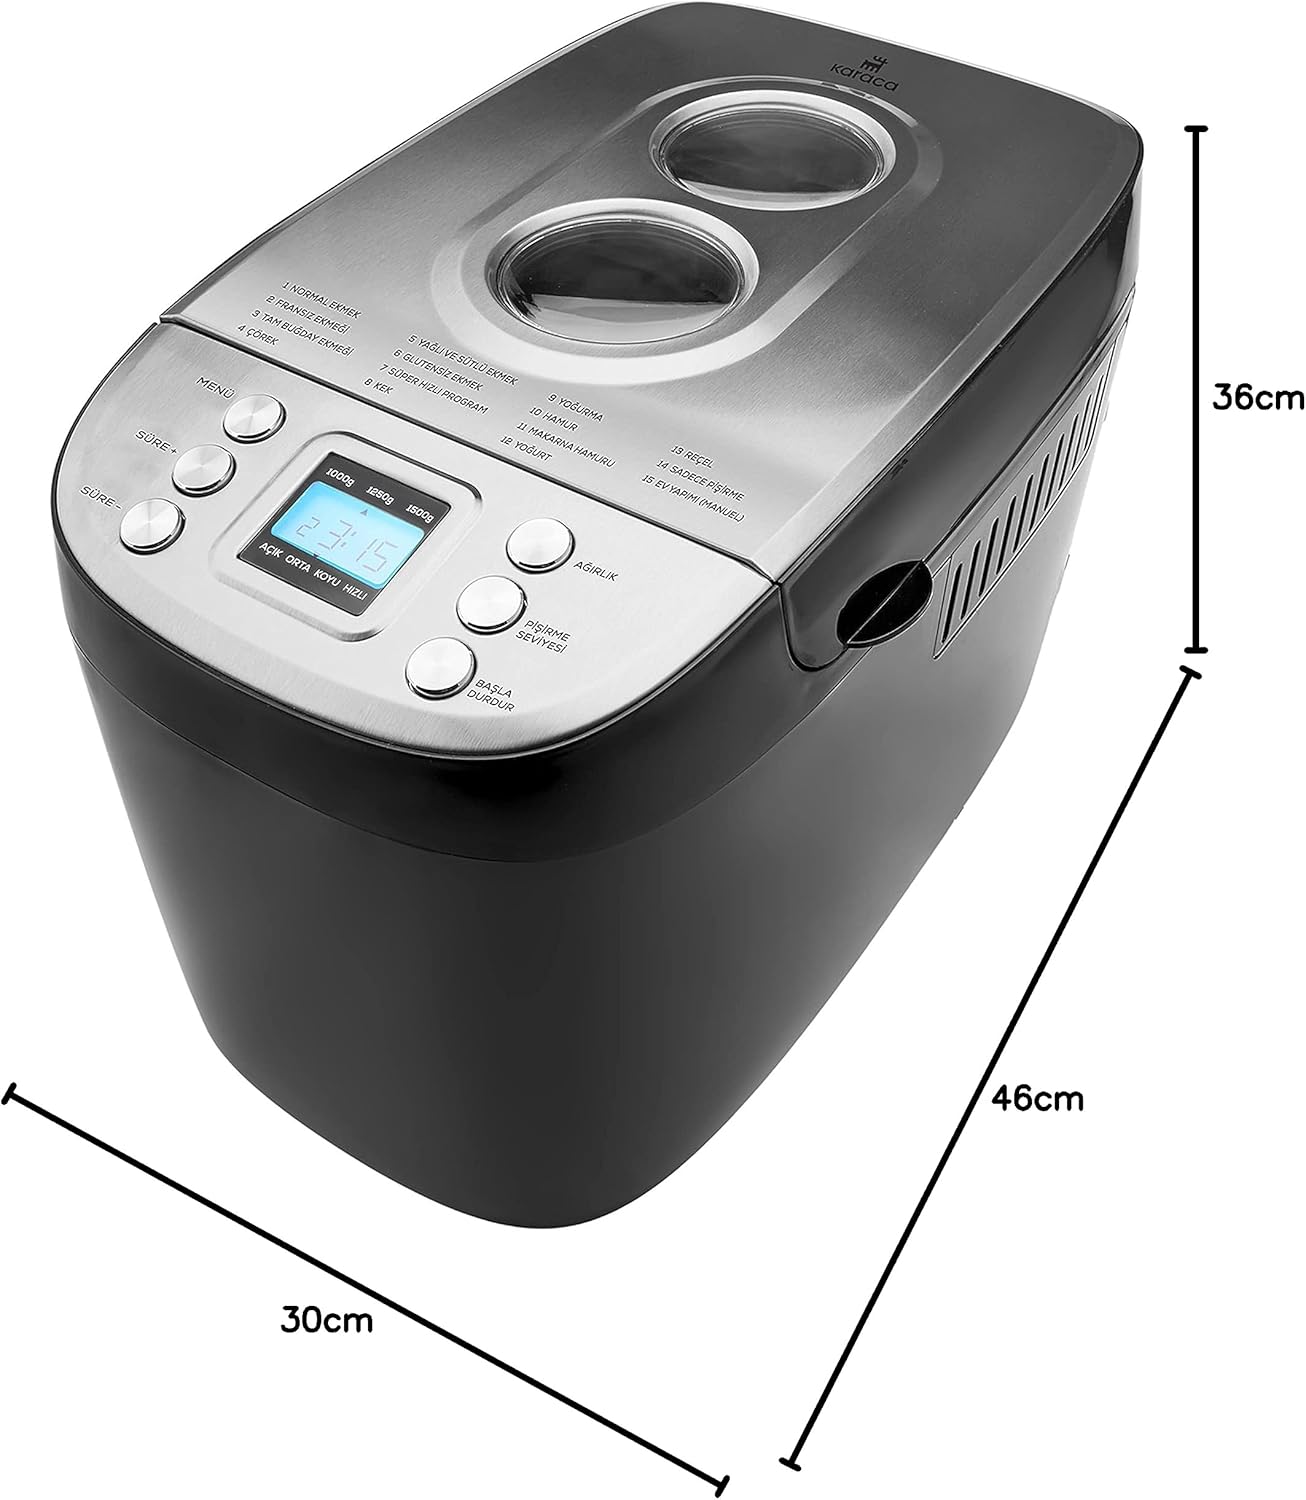
Ofbylding 8.1: Dimensions of the Karaca BakeXL Bread Maker. This image visually represents the depth (30cm), width (36cm), and height (46cm) of the appliance.
9. Garânsje en stipe
For warranty information, technical support, or service inquiries, please refer to the warranty card included with your product or visit the official KARACA website. Do not attempt to repair the appliance yourself, as this will void the warranty and may pose safety risks.
Jo kinne mear ynformaasje en kontaktgegevens fine op KARACA Store on Amazon.