Deeyaple F-8816
Deeyaple LED digitale wekker brûkershânlieding
Model: F-8816
1. Ynlieding
Tankewol foar de oankeapasing the Deeyaple LED Digital Alarm Clock. This manual provides detailed instructions for setting up, operating, and maintaining your new alarm clock. Please read this manual thoroughly before use to ensure proper functionality and to maximize your user experience. This clock features adjustable brightness, dual alarms, a snooze function, and a clear LED display showing both time and day.
2. Safety Information
- Stel it apparaat net bleat oan ekstreme temperatueren, direkt sinneljocht of hege fochtigens.
- Hâld it apparaat fuort fan wetter en oare floeistoffen.
- Use only the provided USB cable for power. An AC adapter is not included.
- Besykje it apparaat net sels útinoar te heljen of te reparearjen. Nim kontakt op mei klanttsjinst as der problemen ûntsteane.
- Hâld bûten it berik fan bern.
3. Package Ynhâld
- Deeyaple LED Digital Alarm Clock (Model: F-8816)
- USB-stroomkabel (Opmerking: stroomadapter net ynbegrepen)
- Brûkershânlieding (dit dokumint)

Figure 3.1: Back panel and side view of the alarm clock, showing control buttons and USB port.
4. Produkt Overview
4.1 Front Display
The front of the clock features a large LED display that shows the time, day of the week, and indicators for Alarm 1 and Alarm 2. The display uses vibrant, multi-colored digits for enhanced readability.

figuer 4.1: Front view of the alarm clock with time and day displayed.
4.2 Top Buttons
- SNOOZE/LIGHT-knop: Located on the top. Press to activate snooze during an alarm or to adjust display brightness.
4.3 Back Controls
- TIID SET knop: Brûkt om de tiidynstellingsmodus yn te gean.
- ALARM SET knop: Brûkt om de alarmynstellingsmodus yn te gean.
- UP (+) Button: Increases values during setting or toggles functions.
- DOWN (-) Button: Decreases values during setting or toggles functions.
- DC 5V-poarte: USB power input.
- RESET knop: Small button to reset the clock to factory settings.

figuer 4.2: Rear view of the alarm clock, highlighting the USB power input and control buttons.
5. Opsette
5.1 It apparaat oanmeitsje
- Connect the provided USB power cable to the DC 5V port on the back of the alarm clock.
- Plug the other end of the USB cable into a standard USB power adapter (not included) or a powered USB port (e.g., computer, power bank).
- It display sil opljochtsje, wat oanjout dat de klok oan is.

Figure 5.1: The alarm clock is powered via a USB cable, ensuring continuous display.
6. Bedriuwsinstruksjes
6.1 De tiid ynstelle
- Druk op de TIID SET button on the back of the clock. The hour digits will start flashing.
- Brûk de OP (+) or DOWN (-) knoppen om it oere oan te passen.
- Parse TIID SET nochris om it oere te befêstigjen en nei de minuten-ynstelling te gean. De minutensifers sille knipperje.
- Brûk de OP (+) or DOWN (-) knoppen om de minuten oan te passen.
- Parse TIID SET a third time to confirm the minutes and move to 12/24H format selection.
- Brûk de OP (+) or DOWN (-) buttons to select between 12-hour (with AM/PM indicator) or 24-hour format.
- Parse TIID SET one last time to save the settings and exit time setting mode.
6.2 Alarms ynstelle (Dûbele alarms)
De klok stipet twa ûnôfhinklike alarmen (Alarm 1 en Alarm 2).
- Druk op de ALARM SET button. The Alarm 1 hour digits will start flashing, and the Alarm 1 icon will appear.
- Brûk de OP (+) or DOWN (-) buttons to adjust the Alarm 1 hour.
- Parse ALARM SET again to confirm the hour and move to Alarm 1 minute setting. The minute digits will flash.
- Brûk de OP (+) or DOWN (-) buttons to adjust the Alarm 1 minutes.
- Parse ALARM SET a third time to confirm minutes and move to Alarm 1 day setting.
- Brûk de OP (+) or DOWN (-) buttons to select the alarm days:
- 1-1: Ien dei alarm
- 1-5: Moandei oant en mei freed
- 1-6: Moandei oant en mei sneon
- 1-7: Monday to Sunday (Every day)
- 6-7: Saturday to Sunday (Weekend)
- Parse ALARM SET again to confirm Alarm 1 settings and proceed to Alarm 2 setting. Repeat steps 2-6 for Alarm 2.
- Nei it ynstellen fan Alarm 2, druk op ALARM SET one last time to save all alarm settings and exit.

Figure 6.1: Alarm days setting options for customized wake-up schedules.
6.3 Snooze -funksje
As der in alarm ôfgiet, druk dan op de grutte knop SNOOZE / LJOCHT button on the top of the clock. The alarm will pause for 5 minutes and then sound again. You can repeat the snooze cycle multiple times.

Figure 6.2: Activating the snooze function by touching the top button for an additional 5 minutes of rest.
6.4 De helderheid fan it skerm oanpasse
The clock has 3 levels of brightness (Bright, Medium, Low) and an option to turn off the display.
- Druk op de SNOOZE / LJOCHT button on the top of the clock (when no alarm is sounding) to cycle through the brightness levels: Bright > Medium > Low > Off > Bright.
- Select the brightness level that best suits your environment and preference.
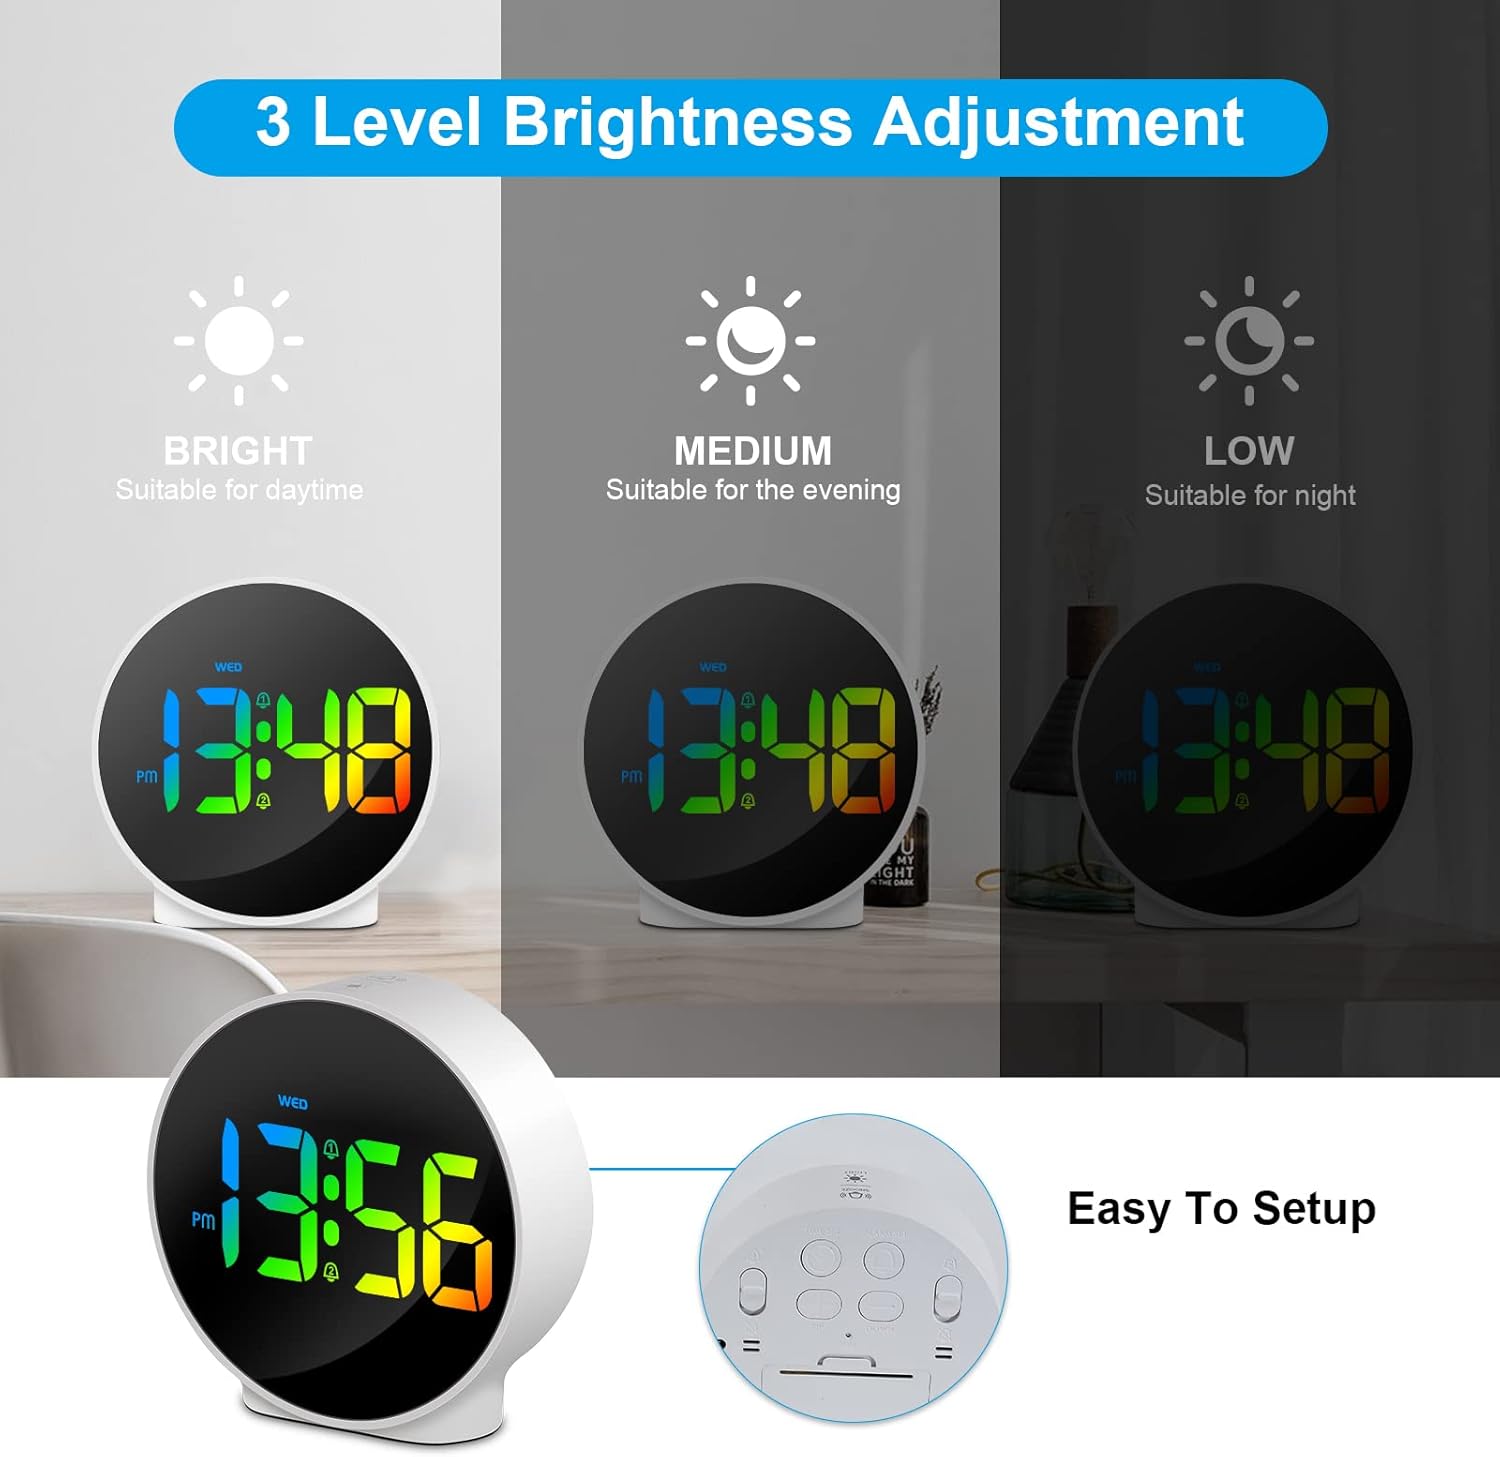
Figure 6.3: Three adjustable brightness levels for optimal viewyn ferskate ljochtomstannichheden.
6.5 Week and Time Display
The clock simultaneously displays the current time and the day of the week on the same screen, eliminating the need to switch displays.

Figure 6.4: The clock displays both the time and the day of the week on a single screen for convenience.
7. Underhâld
- Reiniging: Brûk in sêfte, droege doek om it oerflak fan 'e klok skjin te meitsjen. Brûk gjin abrasive skjinmakkers of oplosmiddels.
- Opslach: As jo de klok foar in langere perioade opslaan, lûk de stroom út it stopkontakt en bewarje him op in koel, droech plak.
8. Probleemoplossing
| Probleem | Mooglike oarsaak | Oplossing |
|---|---|---|
| It skerm is út of dim. | Not powered, brightness set to off/low. | Ensure USB cable is securely connected to a power source. Press SNOOZE/LIGHT button to adjust brightness. |
| It alarm giet net ôf. | Alarm not set, alarm volume too low (not applicable for this model), incorrect alarm days. | Verify alarm time and ensure the alarm icon is displayed. Check alarm day settings. |
| De tiid is ferkeard. | Time not set correctly, power interruption. | Re-set the time following Section 6.1. Ensure continuous power supply. |
| Knoppen reagearje net. | Tydlike softwarefout. | Unplug the USB cable, wait 10 seconds, then plug it back in. If issue persists, use the RESET button on the back (requires a thin object like a paperclip). |
9. Spesifikaasjes
- Merk: Deeyaple
- Model Oantal: F-8816
- Kleur: White shell with multi-color display
- Ofmjittings (L x B x H): 10 x 3.81 x 10 sm (3.94 x 1.5 x 3.94 inch)
- Gewicht: 180 gram (0.4 lbs)
- Funksjes: Dual Alarm, Snooze, Adjustable Brightness (3 levels + off), 12/24H Display, Week Display, Corded Electric
- Power Boarne: USB Cable (DC 5V)
- Display Type: Digitale LED
- Materiaal: Acrylonitril Butadien Styrene (ABS)

Figure 9.1: Dimensions of the Deeyaple LED Digital Alarm Clock.
10. Garânsje en stipe
Deeyaple products are designed for quality and reliability. For any questions, technical support, or warranty claims, please contact the seller or manufacturer directly through your purchase platform. Please retain your proof of purchase for warranty purposes.
Ask a question about this manual
Ask about setup, troubleshooting, compatibility, parts, safety, or missing instructions. Manuals+ will review the question and use this page’s manual context to help answer it.