Produkt oerview
The Consciot Portable LED Camping Lantern Flashlight is a versatile lighting device designed for various outdoor and emergency situations. It features multiple lighting modes, a built-in power bank, and a durable, water-resistant design.

Figure 1: Consciot Rechargeable Multi-Function LED Torch overview.

Figure 2: Consciot Portable LED Camping Lantern Flashlight (2-Pack) with charging capability.
Safety Information
- Do not look directly into the LED light source, as it may cause temporary vision impairment.
- Keep the device away from extreme heat sources, open flames, and highly flammable materials.
- Do not attempt to disassemble, repair, or modify the device. This will void the warranty and may result in damage or injury.
- Hâld bûten it berik fan bern.
- Dispose of the product and its battery responsibly according to local regulations. Do not dispose of in household waste.
- While the device is IPX4 water-resistant, it is not waterproof for submersion. Avoid exposing it to heavy rain or dropping it into water.
Opset en earste gebrûk
Utpakke
Carefully remove the lantern flashlight from its packaging. Verify that all included components are present:
- 2 x Consciot Camping Lantern Flashlight (with built-in rechargeable battery)
- 2 x USB-C oplaadkabel
- 1 x brûkershantlieding (dit dokumint)
Inisjele opladen
Before first use, fully charge the device. The lantern features a built-in 3600mAh lithium-ion battery.
- Locate the USB-C input port on the device.
- Connect the provided USB-C cable to the lantern's USB-C input port.
- Connect the other end of the USB-C cable to a compatible USB power adapter (not included) or a power source.
- It oplaadindikatorljocht sil oangean. In folsleine lading duorret normaal sawat 5 oeren.
- Ien kear folslein opladen, losmeitsje de kabel.

Figure 3: USB-C charging input and USB-A power bank output.
Operating Instructions
Power Button and Light Modes
The lantern flashlight features a single power button to cycle through its 6 lighting modes. Press the button repeatedly to change modes.
- Front Flashlight High Light Mode: Provides a focused beam at 350 lumens.
- Front Flashlight Low Light Mode: Provides a focused beam at 120 lumens.
- Side Lantern High Light Mode: Illuminates 360 degrees for area lighting.
- Side Lantern Low Light Mode: Provides softer 360-degree area lighting.
- Red Light (Stable): A constant red light for signaling or preserving night vision.
- Strobe Red Light (SOS Signal): Knipperjend read ljocht foar needsignalisearring.
To turn off the device, press the power button after cycling through all modes, or press and hold the button for approximately 2 seconds in any mode.

Figure 4: Front Flashlight High and Low Modes.

Figure 5: Side Lantern High and Low Modes.
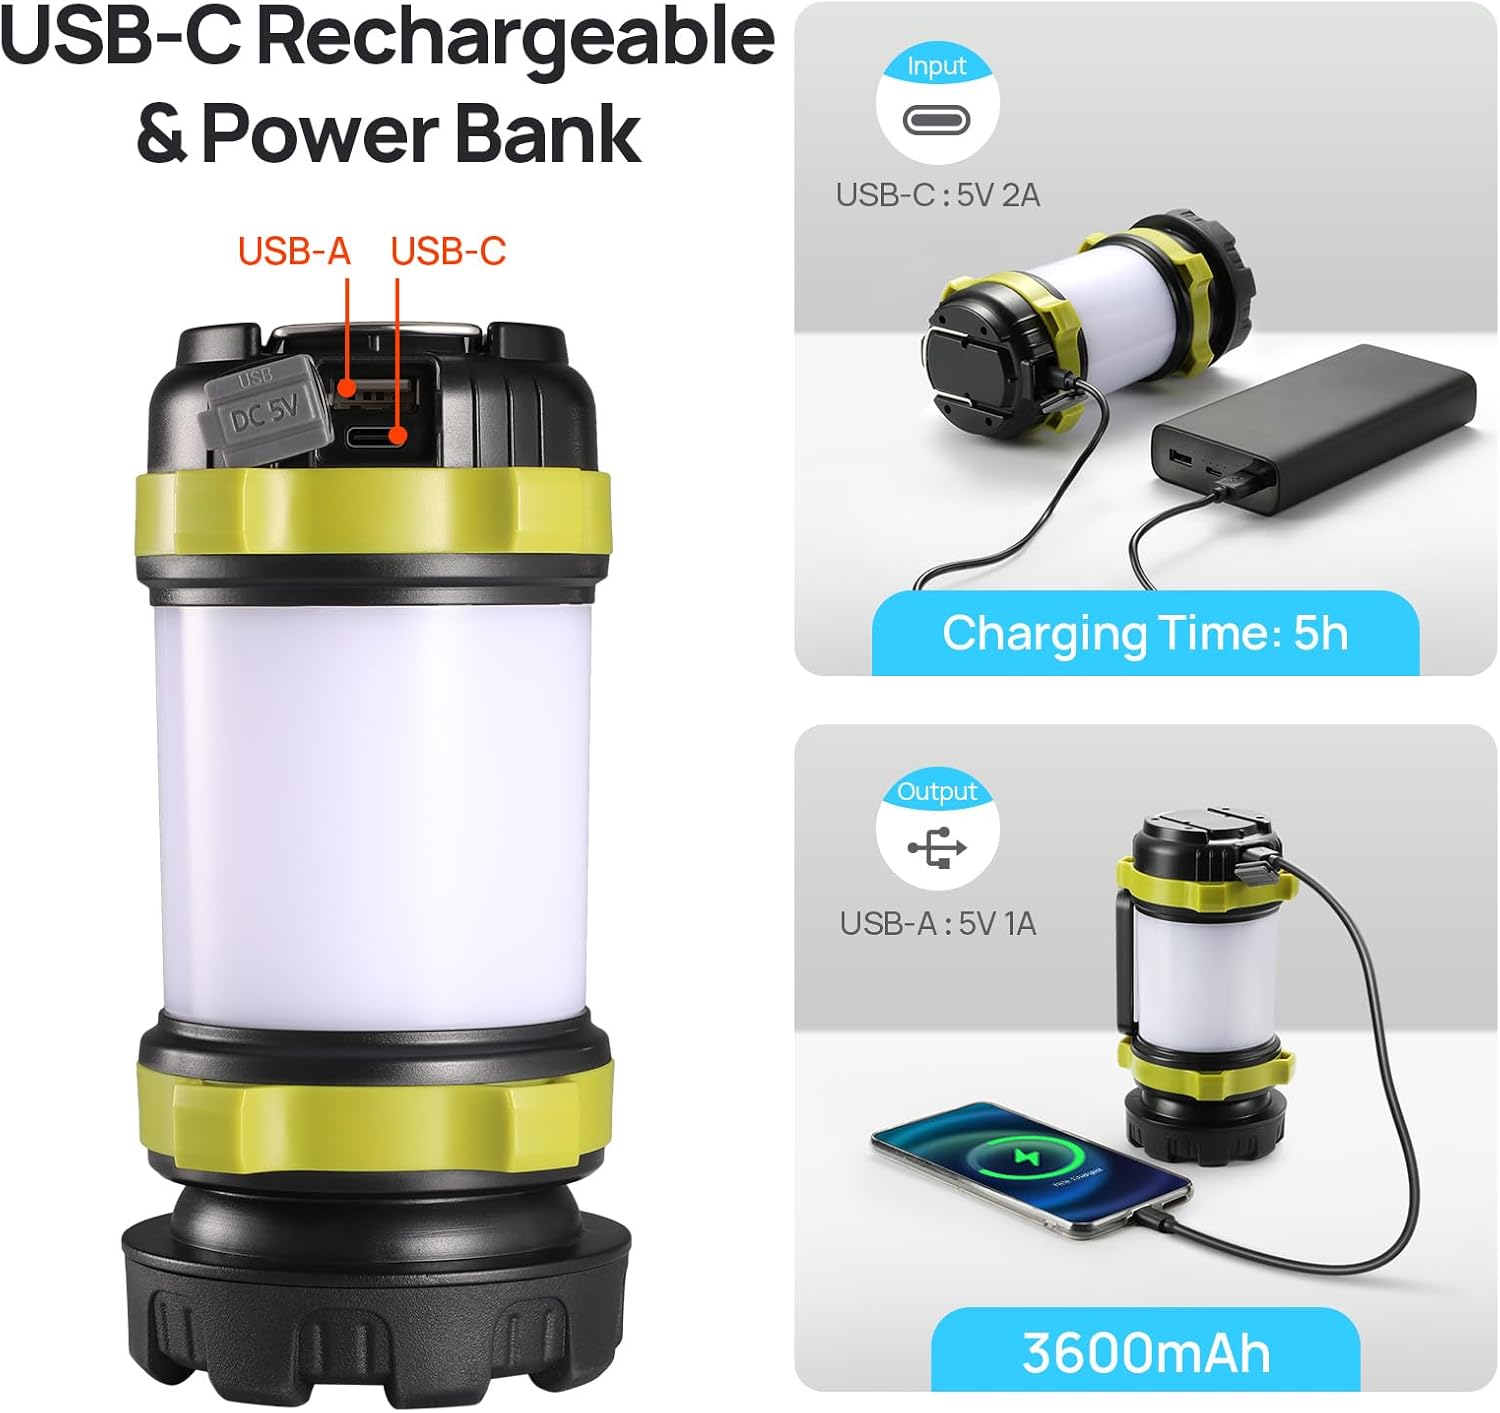
Figure 6: Stable Red Light and Strobe Red Light (SOS) Modes.
Power Bank Funksje
The lantern can be used as a power bank to charge other mobile devices.
- Locate the USB-A output port on the device.
- Connect your mobile device's charging cable to the lantern's USB-A output port.
- The lantern will begin charging your device. The output is 5V/1A.
Note: Using the power bank function will deplete the lantern's battery, reducing its available lighting time.
Portabiliteit en alsidichheid
The lantern is designed for ease of use and portability:
- Draachhandgreep: Use the integrated handle for handheld operation as a flashlight or for easy transport.
- Two-Way Hook: The built-in hook allows for hanging the lantern inside tents, on backpacks, or from branches for overhead lighting.

Figure 7: Portable design with handle and hook for versatile use.
Ûnderhâld
Cleaning
To clean the lantern flashlight, wipe it with a soft, damp cloth. Do not use abrasive cleaners or solvents, as these may damage the surface or internal components. Ensure the charging ports are dry before use or charging.
Opslach
When not in use for extended periods, store the device in a cool, dry place away from direct sunlight and extreme temperatures. It is recommended to charge the battery every 3-6 months to maintain its health and prolong its lifespan.
Batterij Soarch
The device contains a built-in lithium-ion battery. Do not attempt to replace the battery yourself. Avoid fully discharging the battery frequently, as this can reduce its overall lifespan. Charge the device regularly, even if not in active use.
Troubleshooting
| Probleem | Mooglike oarsaak | Oplossing |
|---|---|---|
| Lantern giet net oan. | Batterij is leech. | Charge the lantern fully using the provided USB-C cable. |
| Ljochtútfier is dimmen. | Leech batterijnivo. | Recharge the lantern. |
| Device not charging when connected. | Faulty cable or power adapter; incorrect port used. | Ensure the USB-C cable is securely connected to the input port. Try a different USB-C cable or power adapter. |
| Mobile device not charging from lantern. | Lantern battery is low; incorrect port used; incompatible cable. | Ensure the lantern has sufficient charge. Use the USB-A output port. Try a different charging cable for your mobile device. |
| Water ingress despite IPX4 rating. | Exposure to heavy jets of water or submersion (beyond IPX4 rating). | The IPX4 rating protects against splashing water from any direction. It is not designed for submersion or exposure to high-pressure water jets. Dry the device thoroughly and discontinue use if water has entered. |
Spesifikaasjes
| Eigenskip | Detail |
|---|---|
| Model Number | AOL007-US |
| Ofmjittings (L x B x H) | 3.15" x 3.15" x 6.5" |
| Item Gewicht | 12.2 ounces (sawat 347g) |
| Batterij Type | Built-in Lithium-Ion Polymer (3600mAh) |
| Opladen Ynfier | USB-C, 5V/2A |
| Power Bank Output | USB-A, 5V/1A |
| Oplaadtiid | Ca. 5 oeren |
| Front Flashlight Brightness | Heech: 350 lumen, leech: 120 lumen |
| Ljocht boarne Type | LED |
| Wetter Resistance Rating | IPX4 (wetterbestindich) |
| Materiaal | Acrylonitril Butadien Styrene (ABS) |
| Ynbegrepen komponinten | 2 * Camping Lantern Flashlight, 2*USB-C Cable, 1*User Manual |
Warranty Information
This Consciot product is covered by a 2 jier fabryksgarânsje fanôf de datum fan oankeap. Dizze garânsje dekt defekten yn materialen en fakmanskip by normaal gebrûk. It dekt gjin skea feroarsake troch misbrûk, ûngemakken, net-autorisearre oanpassingen, of normale slijtage.
For warranty claims or service, please contact Consciot customer support with your proof of purchase.
Klant Support
If you encounter any issues or have questions regarding your Consciot Portable LED Camping Lantern Flashlight that are not addressed in this manual, please contact Consciot customer support. Refer to the product packaging or the official Consciot webside foar kontaktgegevens.
Foar ekstra boarnen en produktynformaasje, besykje de Consciot Store on Amazon.