1. Ynlieding
This manual provides essential instructions for the safe assembly, operation, maintenance, and troubleshooting of your Mark Hybrid Gas and Charcoal Grill. Please read this manual thoroughly before using the grill and retain it for future reference. This grill is designed for outdoor use only and combines the convenience of gas grilling with the traditional flavor of charcoal.
2. Safety Information
WARSKÔGING: It net folgjen fan dizze ynstruksjes kin liede ta brân, eksploazje of brânwûnen, wat skea oan eigendom, persoanlik letsel of de dea feroarsaakje kin.
- Allinnich bûten gebrûk: Never operate this grill indoors or in an enclosed area. Ensure adequate ventilation.
- Ferwidering: Maintain a minimum distance of 1 meter (3 feet) from combustible materials (walls, fences, trees, etc.) on all sides and above the grill.
- Stabyl oerflak: Always place the grill on a level, stable, non-combustible surface.
- Bern en húsdieren: Hâld bern en húsdieren altyd fuort fan 'e grille.
- Brandbare floeistoffen: Never use gasoline, kerosene, or alcohol to light charcoal or to relight partially burned charcoal.
- Gas silinder: Use only LP (liquid propane) gas cylinders with a capacity of 20 lbs (9 kg) and equipped with an OPD (Overfill Protection Device). Always check for gas leaks before each use.
- Hot Surfaces: Grilloerflakken wurde ekstreem hjit tidens gebrûk. Brûk hjittebestindige wanten en geskikt ark.
- As ôffier: Allow charcoal ashes to cool completely before disposing of them in a non-combustible container.
3. Package Ynhâld
Before assembly, ensure all parts are present and undamaged. If any parts are missing or damaged, do not attempt to assemble or operate the grill. Contact customer support for assistance.
- Main Grill Body Assembly
- Gas Burner Assembly (3 burners)
- Cooking Grates (Gas and Charcoal sections)
- Houtskoal Tray
- Front-Loading Fuel Door
- Side Shelfs
- Wheels and Axle
- Gasregulator en slang
- Hardwarepakket (skroeven, moeren, ringen)
- User Manual
4. Gearstalling en opset
Assembly typically requires two people. Follow the step-by-step instructions provided in the separate assembly guide included with your grill. Ensure all connections are secure before proceeding.
4.1. Initial Assembly Steps
- Attach the legs and wheels to the main grill body.
- Secure the bottom shelf and gas cylinder support.
- Install the side shelves.
- Place the charcoal tray and cooking grates into their respective sections.
- Ensure the front-loading fuel door is properly seated.
4.2. Gas Connection
- Soargje derfoar dat alle brânerkontrôleknoppen yn 'e 'ÚT'-posysje steane.
- Connect the regulator hose to the gas cylinder valve. Hand-tighten firmly.
- Perform a leak test: Apply a soapy water solution to all gas connections. Open the gas cylinder valve. If bubbles appear, there is a leak. Close the valve immediately and tighten connections. Repeat the test. Do not use the grill if leaks persist.
4.3. Inisjele ôfbaarning
Before cooking food for the first time, perform an initial burn-off to remove any manufacturing oils or residues.
- Gas Section: Light the gas burners (see Section 5.1) and run on high for 10-15 minutes with the lid closed.
- Charcoal Section: Add a small amount of charcoal and let it burn for 15-20 minutes with the lid closed.
Allow the grill to cool completely after the burn-off.
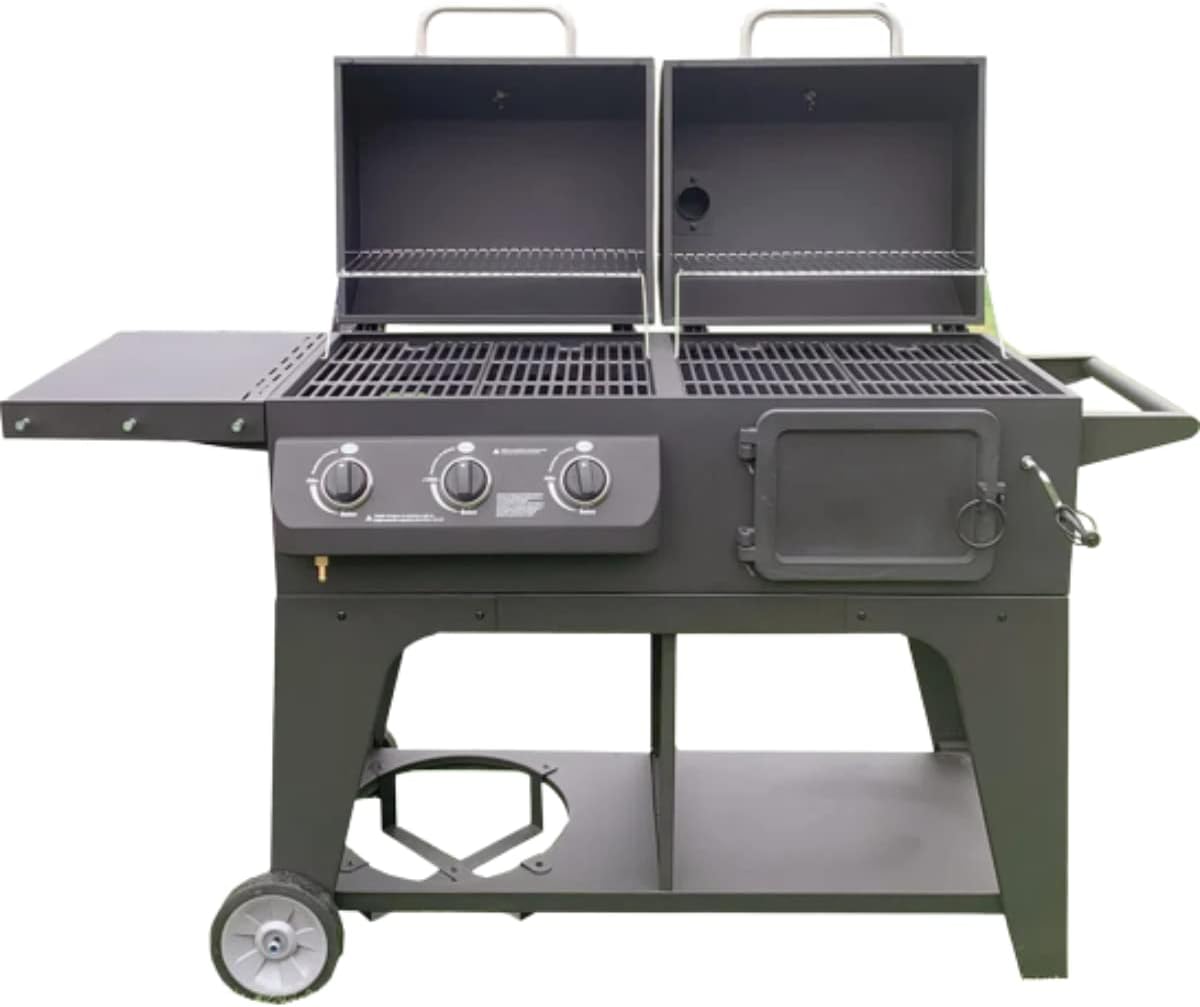
Ofbylding 1: Front view of the Mark Hybrid Gas and Charcoal Grill, showcasing the gas control panel, two cooking chambers, and side shelves.
5. Bedriuwsinstruksjes
5.1. Gas Grilling
- Iepenje de gassilinderklep stadich.
- Iepenje it grilldeksel.
- Push and turn one burner control knob to 'HIGH'.
- Press the electronic igniter button (if equipped) repeatedly until the burner lights. If not, use a long match or lighter through the lighting hole.
- Once the first burner is lit, turn on adjacent burners by pushing and turning their knobs to 'HIGH'.
- Close the lid and preheat the grill for 5-10 minutes. Adjust burner controls to achieve desired cooking temperature.
- To turn off, turn all burner control knobs to 'OFF', then close the gas cylinder valve.
5.2. Charcoal Grilling
- Open the charcoal chamber lid and the front-loading fuel door.
- Place charcoal briquettes or lump charcoal into the charcoal tray. Do not overfill.
- Use a charcoal chimney starter for best results. Alternatively, use solid fire starters (never liquid accelerants).
- Once charcoal is fully lit and covered with a light gray ash, spread it evenly in the tray.
- Close the lid and adjust the air dampers (if present) to control temperature. More open dampers mean higher heat.
- To add more charcoal during cooking, use the front-loading fuel door.
- After cooking, close all dampers to extinguish the charcoal. Allow to cool completely before cleaning.
5.3. Hybrid Grilling
The hybrid design allows for simultaneous use of both gas and charcoal sections. This is ideal for cooking different types of food at varying temperatures or for adding a smoky flavor to gas-grilled items.
- Follow the lighting procedures for both gas and charcoal sections independently.
- Monitor temperatures in both chambers using the built-in thermometers.
- Adjust gas burner controls and charcoal dampers as needed to maintain desired heat levels in each section.

Ofbylding 2: Boppe-nei-ûnderen view of the grill with both lids open, clearly showing the separate gas and charcoal cooking grates and the internal structure.

Image 3: Close-up of the gas control panel with three burner knobs and the electronic igniter button, located on the left side of the grill.

Image 4: Close-up of the charcoal section's front-loading fuel door and the right side of the grill, showing the handle and wheel.
6. Underhâld en Cleaning
Regelmjittich skjinmeitsjen en ûnderhâld sil de libbensdoer fan jo grill ferlingje en feilige wurking garandearje.
6.1. Nei elk gebrûk
- Koken roosters: While still warm, brush cooking grates with a stiff wire brush to remove food residue.
- Ash Removal (Charcoal Section): Once completely cool, remove the charcoal tray and dispose of ashes in a metal container. Clean the inside of the charcoal chamber.
- Grease Tray: Empty and clean the grease tray located beneath the gas burners.
6.2. Regelmjittich ûnderhâld
- Gasbrenners: Kontrolearje de brânerpoarten periodyk op blokkades (bygelyks, spinnekop) webs, food debris). Clean with a wire brush or pipe cleaner.
- Gasslang en regulator: Inspect for cuts, cracks, or excessive wear. Replace if damaged. Perform a leak test regularly.
- Eksterieur: Wipe down exterior surfaces with a mild soap and water solution. For stainless steel parts, use a stainless steel cleaner.
- Opslach: When not in use for extended periods, store the grill in a dry, protected area. Disconnect the LP gas cylinder and store it outdoors in a well-ventilated area, away from direct sunlight.
7. Probleemoplossing
Sjoch dit diel foar faak foarkommende problemen en har oplossingen.
- Gas Burner Won't Light:
- Check if the gas cylinder valve is open.
- Ensure there is gas in the cylinder.
- Verify gas connections are secure and there are no leaks.
- Check burner ports for blockages.
- Ensure the igniter electrode is clean and properly positioned.
- Uneven waarmte:
- Gas: Clean burner ports. Ensure gas pressure is adequate.
- Houtskoal: Distribute charcoal evenly. Adjust dampers for proper airflow.
- Oermjittige flare-ups:
- Trim oerstallige fet út fleis.
- Meitsje de kookroosters en fetbak regelmjittich skjin.
- Reduce cooking temperature.
As problemen oanhâlde nei it besykjen fan dizze oplossingen, nim dan kontakt op mei klanttsjinst.
8. Spesifikaasjes
- Model: Churrasqueira Hibrida
- Merk: Merk
- Materiaal: Rustfrij stiel
- Ynstallaasje type: Frijsteand
- Handgreep Materiaal: Rustfrij stiel
- Spesjale eigenskippen: Hybrid (Gas and Charcoal)
- Ynbegrepen komponinten: Charcoal tray, front-loading fuel door
- Algemiene ôfmjittings (L x B x H): 172 cm x 68.6 cm x 127 cm (67.7 inches x 27 inches x 50 inches)
- Fuel Type: LP Gas and Charcoal
9. Garânsje en stipe
For warranty information, please refer to the warranty card included with your product or contact the retailer where the grill was purchased. For technical support or replacement parts, please contact Mark customer service through their official webside of de kontaktgegevens dy't jo yn jo oankeapdokumintaasje hawwe jûn.