Ynlieding
This manual provides essential information for the safe and effective use of your HON Ignition 2.0 ReActiv Ergonomic Fabric Mid-Back Task Chair. Please read these instructions carefully before assembly and operation to ensure proper function and longevity of your product.
Feiligens warskôgings
Folgje altyd dizze feiligensrjochtlinen:
- Soargje derfoar dat alle komponinten feilich fêstmakke binne foar gebrûk.
- Net stean op 'e stoel.
- Foarkom it brûken fan 'e stoel op ûneven oerflakken.
- Exercise caution when using the tilting mechanism to prevent injury.
- Hâld lytse dielen fuort fan bern by de montage.
Opset en gearkomste
Follow these steps to assemble your HON Ignition 2.0 ReActiv Task Chair:
- Befestigje tsjillen oan 'e basis: Insert each caster into the holes at the end of each leg of the chair base until it clicks securely into place.
- Insert Gas Lift Cylinder: Plak it gruttere ein fan 'e gasliftsilinder yn it sintrale gat fan 'e stoelbasis.
- Befestigje sitmeganisme: Befestigje it sitmeganisme oan 'e ûnderkant fan it sitkessen mei de levere skroeven. Soargje derfoar dat de foarkant fan it meganisme oerienkomt mei de foarkant fan 'e sit.
- Connect Seat to Cylinder: Carefully place the assembled seat onto the top of the gas lift cylinder, ensuring it is centered.
- Backrest befestigje: Align the backrest with the mounting plate on the seat mechanism and secure it with the appropriate screws.
- Ynstallearje earmsteunen: Attach the armrests to the designated slots on the seat mechanism or chair frame, tightening all screws firmly.
After assembly, verify that all connections are tight and the chair is stable before use.
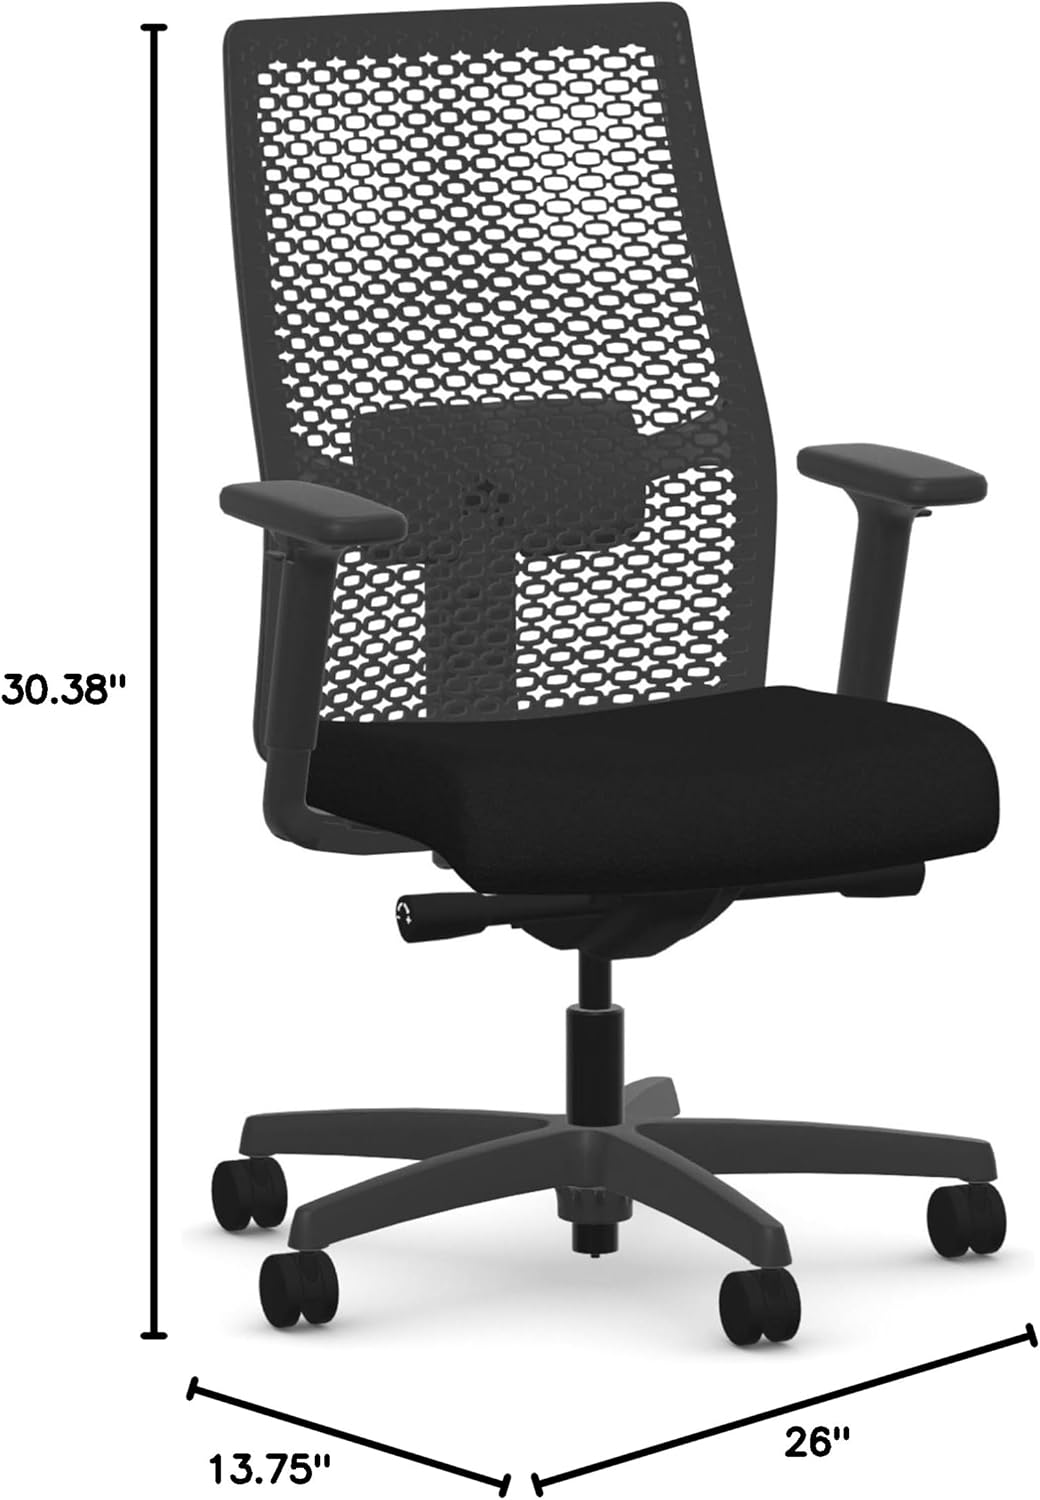
Ofbylding: Front view of the HON Ignition 2.0 ReActiv Task Chair with overall dimensions (26"D x 13.75"W x 30.38"H) indicated.
Bedriuwen en oanpassingen
Your HON Ignition 2.0 ReActiv chair offers multiple adjustments for personalized comfort:
- Seat hichte oanpassing: Locate the lever on the right side, under the seat. Pull the lever up to raise the seat; release to lock. To lower, sit on the chair, pull the lever up, and release when at desired height.
- Oanpassing fan 'e lendestipe: The lumbar support can be adjusted to provide optimal lower back comfort. Locate the adjustment knob or lever on the backrest and rotate or slide it to position the support correctly for your back.
- Armleuning oanpassing: The armrests are adjustable in both height and width. Use the buttons or levers located on the armrest supports to raise or lower them, and to slide them inward or outward for a comfortable arm position.
- Kantelje en efteroerlizze: This chair features a tilting mechanism with 3 reclining positions. Use the tilt lock lever (typically on the left side under the seat) to engage or disengage the tilt. Adjust the tension knob (usually at the front center under the seat) to control the resistance of the recline.
- Swivel funksje: The chair is designed with a 360-degree swivel base for easy movement and access to your workspace.

Ofbylding: Frontaal view of the HON Ignition 2.0 ReActiv Task Chair, highlighting the seat and armrests.

Ofbylding: Efterkant view of the HON Ignition 2.0 ReActiv Task Chair, showing the mesh backrest and lumbar support area.
Ûnderhâld en soarch
To maintain the appearance and functionality of your chair:
- Reinigingsstof: For general cleaning, use a soft cloth and a mild detergent solution. For spills, plak skjin immediately with a clean, damp doek. Foarkom skealike gemikaliën of skuurmiddels.
- Reinigingsframe: Wipe the stainless steel frame and plastic components with a soft, damp doek.
- Soarch foar tsjillen: Kontrolearje de tsjiltsjes periodyk op hier of pún en meitsje se skjin as nedich om in soepele beweging te garandearjen.
- Befestigingskontrôle: Regularly inspect all screws and bolts to ensure they are tight. Retighten if necessary.

Image: Close-up detail of the black fabric used on the seat of the HON Ignition 2.0 ReActiv Task Chair.
Troubleshooting
As jo problemen hawwe mei jo stoel, sjoch dan nei de folgjende mienskiplike oplossingen:
- Stoel piept: Check all bolts and screws for tightness and retighten if loose. A small amount of silicone spray on moving parts (avoiding fabric) may help.
- Moeilijkheden mei it oanpassen fan de hichte: Ensure the gas lift lever is fully engaged. If the cylinder is not responding, it may need replacement.
- Stoel fielt ynstabyl: Verify that all casters are fully inserted into the base and that the base is not damaged. Ensure all assembly screws are tight.
- Armrests Not Holding Position: Check the adjustment mechanisms on the armrests for any obstructions or damage.
Spesifikaasjes
| Eigenskip | Detail |
|---|---|
| Merk | HON |
| Model Namme | Ignition 2.0 ReActiv |
| Model Number | Ignition 2.0 ReActiv |
| Kleur | Swart |
| Materiaal (frame) | Rustfrij stiel |
| Material (Seat/Fill) | Foam |
| Produkt Ofmjittings (D x B x H) | 26" D x 13.75" W x 30.38" H |
| Item Gewicht | 54 pûn sterling |
| Oanrikkemandearre Uses | Kantoar |
| Age Range Beskriuwing | Folwoeksen |
| Ynbegrepen komponinten | Arm Pad |
| Oerflak Oanrikkemedaasje | Hurde ferdjipping |
| Indoor Outdoor Gebrûk | Binnen |
| UPC | 196235079055 |
| Oanfoljende funksjes | Ferstelbere hichte |
| Furniture Base Movement | Swivel |
| Reclining Posysje Count | 3 |
| Tilting | Ja |
| Werom Style | Solide rêch |
| Patroan | Solid |
| Finish Soarten | Poeder Coated |
| Foarm | Rjochthoekich |
| Arm Style | Mei earms |
| Leg Style | Taperige skonk |
| Produkt Care Ynstruksjes | Spot skjin |
Warranty Information
For detailed warranty information regarding your HON Ignition 2.0 ReActiv Task Chair, please refer to the official HON website or contact HON customer service directly. Warranty terms and conditions may vary.
Klant Support
If you require further assistance, have questions about assembly, operation, or need to report a defect, please contact HON customer support. Contact details can typically be found on the manufacturer's official webside of op 'e produktferpakking.